Showing posts with label wire. Show all posts

Thursday, August 2, 2018

Slighty Creepy Candlesticks


From the same estate sale that brought you the ceramic skull, I now give you marginally spookified candlesticks.  When I purchased these candlesticks I had every intention of painting them black and replacing the beads with black ones.  But the more I looked at them, the more I fell in love with the existing marbled colors.  It seemed a shame to bury all that depth under flat black.


So if I wasn't going to turn them a spooky shade of black, I had to figure out another way to creep them up.  My other self imposed challenge was to use stuff I already had.

First I took them apart cleaned all the rusted areas with vinegar, after doing a test patch, and then lightly oiled those areas.  Then they were really bright and cheery looking, so I had to put an end to that.  After some contemplation I decided to use black shoe polish to darken things up.  I applied it to the grooves and creases and then wiped off the excess.

I figured skull beads would lend a little creepiness, but I didn't want to use my good skull beads for this.  Just so happens I have a bunch of plastic skull pony beads. I painted them with the same textured primer paint that I used on the ceramic skull.  Then gave them a coat of black, sponged on  Renaissance Brown and highlighted with Champagne Gold.  I have probably a half dozen paints from the Deco Art Dazzling Metallics line and I really love the colors, much richer than other brands I have used.


The downside of using pony beads is the hole was too big.  To fix that I forced 3mm round beads into the top and bottom of the beads. Some I forced a bit too much and split a few beads.  The beads were cheap coated plastic wannabe white pearls, so yay for using up more junk!  But boo, now I had to paint over the part of them that was visible.  But this time I waited until everything was assembled to touch up the paint in case I dinged anything up.

All in all I like the way the skull beads turned out.  I definitely see myself using them on bottles in the future.  I might even split a few on purpose to get a lower profile.  The nice thing is the mold line runs down either side of the face, so when they do split it's in the perfect spot.

I tried incorporating as many of the original beads as possible. I even refrained from redoing the wiring on the beaded links, which was really hard for the perfectionist in me. I wanted to prove to myself that if every wire link wasn't absolutely perfect the world wouldn't end and it didn't.

I did replace the original split rings, which were too poorly constructed to ignore.  Fortunately I happen to have some antique copper split rings that I bought by accident.  Split rings are awesome for durability, but I don't like the way they look. I don't why, I just don't.  With my jewelry I always double up on jump rings whenever the design allows for the added security.  Here I think a single jump ring would have sufficed and looked better, but since I was on a roll using up junk I've been sitting on, split rings it was.


I touched up the paint when everything was on the candlesticks.  I held a gloved hand behind the strands so I didn't paint the candlestick, but everything else including the wire got a little paint on it and that's ok.  After I touched up the skull beads I purposely sponged paint on all the other beads to give them a more uniform look.

So subtly creepy, far from perfect, not even close to my original vision and I'm ok with that.

Wednesday, October 18, 2017

Modifed Ouija Planchette


Recently my daughter and her friends have begun dabbling in the occult.  Maybe I should be concerned about hell and damnation, but I'm just happy to see them put their phones away.  By some miracle they either don't know there are Ouija apps or they don't care.  If I had known all a board game needed was a little mysticism to attract this kind of attention, I would've claimed my Pente board had divination powers.  I just might try that yet.

For a while they used a Ouija board made out of paper and cardboard.  But we are now officially owners of an overpriced piece of chipboard and a hunk of plastic.

I was a little disappointed that it didn't come with any ominous rules, the girls already knew all the basics, but it still would have been fun to see them in print.  On the back of the box it does give some cheesy examples of what to ask, "Will my parents let me go to the concert? What should I wear?"  That's where I put my foot down and told them under no uncertain terms were they going to open a portal to hell just to find out what they should wear.

The board isn't horrible.  It's pretty sturdy, the graphics are still the William Fuld design.  The planchette on the other hand is the most boring shade of beige plastic imaginable. Probably the only kind of spirit you could attract with it would be one that would want to do your tax returns.  I guess that wouldn't be so bad, unless being on the other side of the veil transposes numbers, then you'd have a hard time explaining that one to the IRS.

Well I decided no daughter of mine was going summon malevolent spirits or be possessed by evil demons using institutional beige accessories.

First step is to remove the clear plastic piece.  Cover the planchette with Mod Podge, but not inside the ring.  Then add a single layer of tissue paper.  Notice I laid it right across the opening. Apply Mod Podge to outside edges of the planchette and fold the tissue over it.  Gently pat it all down.  You can pull the excess tissue paper off along the wet edge.


Design and make embellishments.  I won't lie. This part actually took me a while, which is a little ridiculous when the end product was a fairly simple design. But I changed my mind about a billion times before I got there. So I have this whole slew of twisted wire bits to adorn bottles at the next craft party.  All wire bits were hammered between two metal blocks. Just enough to make sure they would lay flat not enough to flatten the wire itself.


I used 18 gauge wire, but you could use a thin cord or small metal filigrees. I've even seen where people make awesome swirly designs with hot glue, although all I can do with a glue gun is make gloppy messes with lots of stringies.  The eye is from one of the local craft stores, but I can't remember which one. It came on a strand with five more just like it.

Glue the pieces in place and let dry.


I covered everything with Mod Podge except for the now covered opening, and the eye charm.  Again I used a single layer of tissue paper, covering everything including the eye.  I applied more Mod Podge and added on more lay one more layer, making sure to push into all the crevices around the wire and around the edge of the eye charm.  I slit the paper covering the eye and pushed it down around the eye piece. I added a small piece of tissue paper above and below the eye to flesh it out a little more and coated it in Mod Podge.

Once it was dry I trimmed around ring to make sure there was no tissue paper in the opening, otherwise the clear plastic piece wont fit. I painted it all black, including the inner ring and underneath.  After that dried I sponged on dark brown and metallics in brown, copper and gold. Any paint that I got on the eyeball I wiped off with a damp clean paintbrush.

Aside from me spending way more time than I should have making a few wire curlicues, this was a quick project and ended up looking way cool.  I'm sure all the really cool spirits will be hanging out at our house.

"My Ouija brings all the souls to the yard,
 And they're like, its better than yours,
 Damn right, its better than yours..."

...sorry, been spending too much time around teens lately.  

I also bought my daughter Ouija Board Nightmares: Terrifying True Tales.  It starts with a little mysterious history of the Ouija board, but it's mostly very short urban legend type stories.  There were quite a few stories about kids at sleepovers or parties just messing around with the Ouija and then...So absolutely perfect for the target audience at our abode.

Maybe they'll get into tarot cards next.  I would love to have a set of these Twin Peaks cards.

Sunday, March 6, 2016

Itsy Bitsy Wire Spider Pendant


This is my last string pendant creation. See previous entries here and here. 
For this one, basic thread wrapping serves as a background for a little wire spider. 

Start with 6 inches of 18 gauge wire.  This is a smaller gauge than I recommended for my previous thread pendant.  Because this one is much smaller, the full length is 1.75 inches, 18 gauge will provide plenty of support.  To make the tear drop shape, bend the center of the wire partway around something small and round.  Here I'm using a seed bead tube, approximately 15mm in diameter. 
A thick marker would also be a good choice. 


Where the wire crosses at the top, bend each
wire slightly so the two ends rest side by side.


Measure the outline of the teardrop, in this case it's 3 inches, and then you will want to make a coil half that size. [see my coil setup]  For a 1.5inch coil I used 2.5 feet of 26 gauge wire. Stretch the coil until it's doubled in length.  Feed it onto the tear drop and wrap both ends around the top of the teardrop.


Bend the 18 gauge wire back at a 90 degree angle, then curve it around.
Trim the short end of the 26 gauge wire and
wrap the long end around the bottom of the loop.


Even up the ends of the 18 gauge wire and
give them a little curl with a round nose pliers.


Tie a thread around the top use a surgeon's knot to secure it. 


Drop the thread straight down the middle
and start working it in a clockwise direction.


Unless you are robot, in which case Cyberdyne called and they
want their arm back, your coils might not be perfectly spaced,
in which case you might run into this situation.


You can either just keep going, doubling over a few of the top coils until the bottom is filled in (left picture) or unwind everything and start a couple spaces over to the right and do it all over again (right picture) Yes, it's a negligible difference,
but if it will niggle away at you, now is the time to set it right. 


Now for the spider portion of this pendant, cut 4 lengths of 26 gauge wire, 3inches long. Your average craft wire is a little stiff for this part.  It's not impossible to use but I prefer a softer wire.  For this I used Artistic Wire's silver plated copper.  Another option is to use a smaller gauge wire.  
 
For the record 26 gauge is thin enough to poke your fingers like a needle
and the craft gods have been known to demand blood sacrifices. 
With that in mind form the wires into a loose overhand knot.
 
Or you can cheat, skip the knot and wrap a fifth
wire around the center to form your spider body.


Gently work the knot smaller by pulling the ends and also pushing the
wires out from the center of the knot to move the ends farther out. 


When you've moved it as much as you can by hand, spread the wires out and working one side at a time tug on each individual wire, pulling just a little bit.  Keep tugging each wire in rotation until the knot is fairly tight. 
If you like you can flatten it a little with a pair of pliers. 


Position the spider on the pendant and fold the legs over to keep in place. 
It looks like a big mess from the back.   


One leg at a time, pull the wire up and curl the end so you can poke it down and around the frame.  This part is fussy.  You have to follow along the curve
of the coil and also poke through the space between the threads. 
It's about as fun as threading a needle, sometimes it helps to hold the end steady with a needle nose pliers. 


Once you've successfully wrapped it around, it looks like this. 
Pull it all the way around to the back and then snip it with a flush cutter. 


Do the same for the rest of the legs.


Now this the fun part, grab a leg with a needle nose pliers and give it a little twist. 
About a 45 degree twist, counter-clockwise for the left side legs and clockwise for the right.


Do all the legs on one side and then the rest of the legs on the other.
I love how such a little tweak makes them look so leggy and ta-da it's done. 


Below, the one on the left I've done my usual curly swirly mess at the top.  It's pretty, but I think it detracts from the spider, which is why I went with a very basic design in the tutorial.  In both the pictures below I've reversed the direction of the leg crimp if you were wondering what that looks like.


This one I anchored the threads between wire wrapped beads.  If you like the look,  I think it's easier to wire wrap the legs in-between the beads. 
If I were to do this again I would thread wrap the pendant all the way around twice to give it a more solid background.


For size comparison here is the original spider pendant on the left, the current one in the middle and a slightly smaller one on the right.  The smallest one was formed using a thick Crayola marker and creating a shorter teardrop.


And just because I love the texture of those little wire twists,
here's something I played around with using junk wire. 
 

Saturday, February 27, 2016

String Pendant Variations

6mm beads, 16 gauge wire
Last time I wrote about making string art pendants using coiled wire.  Here are a few alternatives to using coils.   

The first alternative is stringing beads on a wire.  The nice thing about doing it this way, is it takes almost no time to string a handful of beads on a wire.

Finding small beads with large enough holes to fit 16 or at least 18 gauge wire can be challenging. 

Coils by design have nice little spaces for the threads to go, beads do not.  With the purple beaded pendant below, the last few thread wraps were really tight. I starting getting nervous I was going to break the thread.  For the black and silver one I gave myself some extra room, but I had to sell my soul to keep the beads evenly spaced while wrapping them. The round beads on the skull pendant were a little more forgiving and even after space between them got tight, the valley between the outer edge of the beads was deep enough to hold a few more threads. 

18 gauge wire, Toho seed beads, size 8 left, size 6 right


The next alternative is to wire wrap beads around the frame.  I recommend 24 or 26 gauge for wrapping the beads.  The best part of this is being able to thread wrap at angles that wouldn't hold very well with coil. Also since the wire being used to wrap the beads is a much smaller gauge, smaller beads can be used too. 


The last alternative that I'm going to show is cup chain wire wrapped around the frame.  This is 4mm cup chain, with a dream catcher weave combined with a little thread wrapping.   


A few more tips.  Don't be afraid to add different colors or patterns together. 


If you finish a piece and decide later you don't like it, you can always add to it instead of completely redoing it.  Here I didn't like the gap, so I added the silver.


If you don't watch your thread tension you can pull your frame out of shape.  It's really easy to use a tighter tension when you begin a new color/thread, so make sure you are not pulling too much.  The fact that this was made with 18 gauge didn't do me any favors, 16 gauge is much sturdier.  Also when the frame gets out whack, the previous threads can come loose and then the whole thing unravels.  There is no shame in crying if that happens.   


One more thing I learned, looks can be deceiving.  I wanted to see how variegated thread would play out so I picked up a spool that looked interesting. The picture doesn't do it justice, but even though I now know this spool of thread only contains black, red and gold, I still see orange and fuchsia mixed in.   


I used it for the skull pendant and this lizard one. I still like it, but it's not nearly as exciting as it looks on the spool. 


One more string spider thing coming up and then I'll lay this project to rest.  

Sunday, February 21, 2016

Spider String Art Pendant

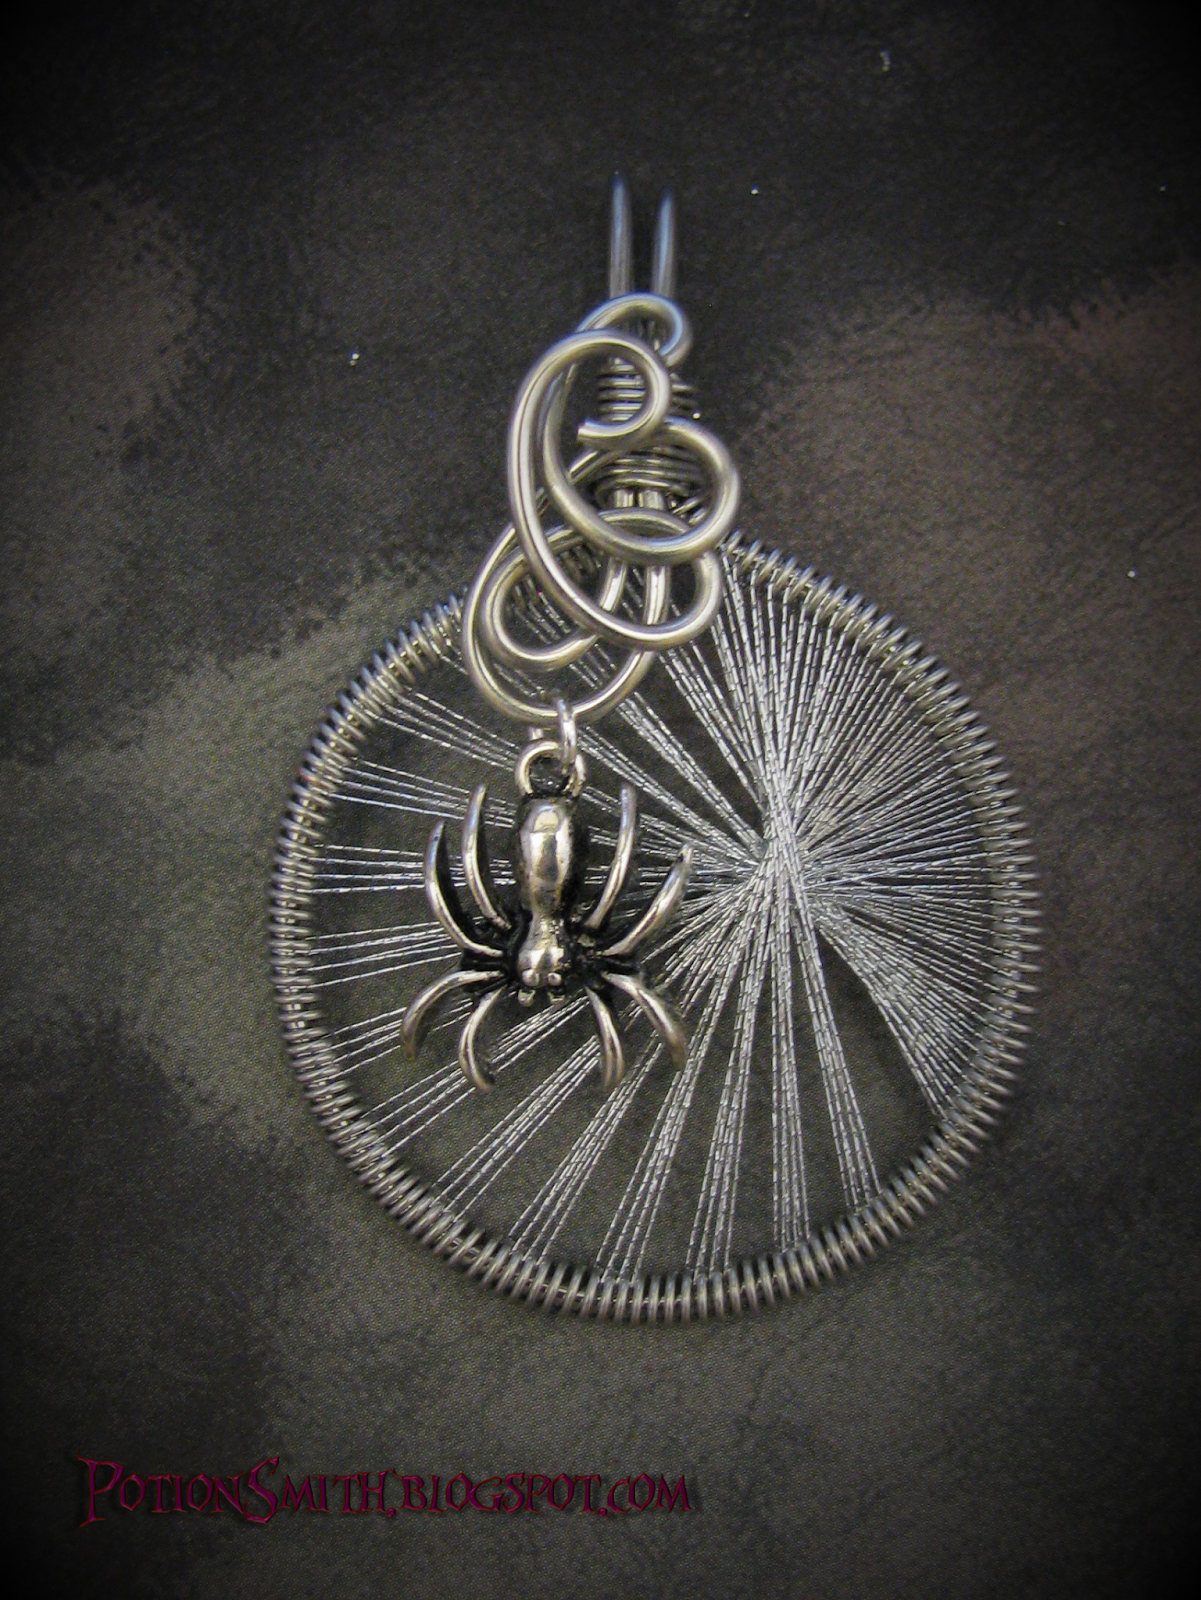
While researching another project I accidentally fell down a rabbit hole that started with string art and ended with Peruvian thread earrings. This is what my brain spit out in the aftermath.  I think it looks spider webby, but then any threaded pattern always makes me think of the masters.


If you find videos to be helpful there are a ton of them, but I found this one by Camille Sharon to be the most useful when I started out. She gives a lot of detailed information that other videos skip over.

The thing about the Peruvian thread earrings is that they are very symmetrical. Nothing wrong with that, I'm just more asymmetrical. The pendant above was inspired by the left-hand picture from mathcraft.wonderhowto.com.  Math sites have some of the coolest patterns like the Yin Yang at artofmathematics.org. Not every pattern is going to translate well. There are some angles that are not going to hold with thread and coil like they would with string and nails or pen and paper, but its fun to play.


To get started you'll need a few things:

Wire coiling gadget - You can make your own. I bought a simple coiling tool with two rods.  I screwed mine to a piece of 1x4 board, a little clunky but portable, since I do most my crafting on the go.  I've seen 5 rod kits going for $10, which with a craft store coupon is pretty inexpensive.  I've still only used the small rod in my kit, so that probably would be overkill for me.

Thread - Starting out I followed the video I mentioned and used separated embroidery floss threads. Some projects use the embroidery floss as is. I think separating the individual strands looks a lot sleeker.  My daughter happened to have a bunch of colors from her friendship bracelet phase, so it was logical to use what was on hand. The upside to embroidery floss is you can get a wide assortment of colors for a small investment.  The downside is separating the threads.  I would cut an arms length of floss and separate the threads and even at that length, it wasn't the most pleasant experience.  And an arms length doesn't get you as far as you might think.  I needed at least 2 or 3 lengths to complete a pendant, which means more loose ends to be tied off.

Once I decided this was going to be a thing, I invested in a few spools of metallic thread.  My colors are limited right now, but life is so much easier. Using any old spools of thread you have laying around is a great option for experimenting with different patterns. 

Wire - For this project I recommend using inexpensive craft wire.  Not to plug Michaels, but I've been very happy with their Bead Landing wire. For this pendant I used 16 gauge wire for the frame.  14 gauge would be even sturdier for the frame, but harder to make the decorative loops at the top.  18 gauge is easier for the decorative loops, but not as sturdy for the frame.  This pendant also uses 24 gauge for the coil.  22 or 26 gauge would also work. 

Glue - This is one thing I don't have a good answer for.  I usually default to E6000 for jewelry things.  I hate using that stuff, but for the times I need it, I haven't found anything that works better. This video uses fabric glue, which sounds interesting but I haven't tried it. I did try Gem-Tac, which I have on hand, applying it just to the knotted ends. I like the smell and consistency better than E6000.  I haven't field tested it yet. [When my daughter was younger I'd let her wear my jewelry on the playground to weed out points of failure, sadly as a tween she doesn't want to be my guinea pig anymore] So I can't say if it will truly keep things from unraveling over time.  I would advise against using super glue or nail polish.

Other tools:
Round nose pliers

Needle nose pliers - Only flat pliers, no teeth, they leave marks. 

Flush cutter - If you are going to do any wire work, get a good flush cutter. It does just that and makes a flat clean cut.  Note: Do not ever never ever use a flush cutter on fully hardened wire (like memory wire) it will ruin the blade.

Nylon pliers (optional) - Nylon pliers are useful for straightening wire. I also like using them for holding wires while wrapping or making minor adjustments without leaving marks.

Embroidery scissors (optional) - They have a nice fine point for trimming threads and if that's all you use them for, they will last for ever.

spider charm (optional)

small jump ring (optional)


So lets get started. Begin with a 12 inch length of 16 gauge wire.  One thing I forgot to mention was a round object to form the shape of your pendant.  Now I'm using some pretty high tech equipment here, so try to keep up. This is a thick cardboard tube. It's about 4.25 inches in circumference and one inch diameter.  The finished pendant will be 1.5 inches across. 

Wrap the center of the wire around the form leaving equal amounts of wire sticking out at each end.   After wrapping it around I like to mark where the wire  meets with a permanent marker to use as a guide later.


Here is my fancy wire coiling setup.  Hold the working end of the wire straight and tight as you turn the handle. If you have trouble sliding the coil off the rod, twist the ends in the opposite direction to loosen the coil.  I prefer to stretch the coil out when it's still on the rod. I can see the spacing better and adjust it without doing wonky things to the shape of the coil.  You might find it easier to just take it off the rod and pull the ends. 


I'm using about 5 feet of 24 gauge wire for a 3 inch coil with an 8 inch tail.  The closer together the coils are, the more anchor points you have to create your pattern, but you don't want the coils too tight.  It's hard to think of thread as taking up much space, but it adds up. Thread thickness and multiple passes affect how much space is needed in-between the coils also.

For your first few pendants, I recommend measuring the circumference of your pendant and making a coil half that size.  After it's fully stretched that comes out to about 10 coils per centimeter.  That will give you a nicely spaced coil that's not too tight, not too loose. The one shown below is a little tighter about 15 coils per centimeter. 


Feed the coil onto the 16 gauge wire.  Remember those marks we made? Use them as a guide and bend the 16 gauge wire at about a 90 degree angle from the pendant circle. Make sure the ends of the 16 gauge wire lie flush against each other and tightly wrap each end of the coil around twice.


Hold the 16 gauge wire right above the coils with the needle nose pliers and bend the wire back at a 90 degree angle.


Bend it into a loop. I find it easier to work it into a curve with my fingers, but you could wrap it around the thicker end of your round nose pliers.


Run the shorter end of the 24 gauge wire up the back, where it will be hidden by the wire wrap.  Press the ends of the 16gauge wire down so the wires lay neatly against the bottom neck of the loop and wrap the longer end of the 24 gauge wire around the whole thing.  Trim the ends of the 24 gauge wire and tuck them away. 


Twist the remaining 16 gauge wire however you want, or more correctly however the wire wants.  Start with the base of the wire and work your way out to the ends using just your fingers at first. I only use the round nose pliers at the very end to curl the tips. 

Make life easy and don't try to force the wire to fit a specific design but rather follow where it wants to go. Even if you mess up, don't try to fix it, you'll just make it worse.  When it's all done you just might surprise yourself and end up liking your "mistake".  Worse case scenario, you can always cut off what you don't like and curl the end. You can also start with a shorter wire if  you don't want a big swirly loopy mess and make simple short loops or coils on each end. 


Now having that big swirly mess out front is a little bit of a hindrance that you'll have to work under, but you want to have all the wire work done before you start wrapping the thread.


Tie the thread using a surgeon's knot.  Whenever possible I like to start at the top where it will be hidden. Then start wrapping.  You want the thread to be snug, but not tight.  Too much tension and you can pull the wire out of shape. Knot the end when you are finished.  If I end in the same spot I finished I'll also knot the two ends together.  Trim the ends and add a dab glue to the knots.

You can leave it as is or attach a charm to one of the loops with a small jump ring. 

Here is what the pattern looks like on paper starting with the purple, then red, green and blue.


Sometimes it's nice to sketch things out.  I find it especially useful when comparing subtle variations.


Here's the blank template I used. 


So have fun, go play and next time I'll share a few variations.