Saturday, November 30, 2013

Traumatized Turkeys


I can’t get out of making Rice Krispie Turkeys, but when I saw these turkey pops, I figured I could change my game. 

As usual I can’t just follow a recipe. I used a modified version of the Rice Krispie recipe on JoyofBaking.com. No one here eats Rice Krispies as a cereal and JoyofBaking.com is nice enough to put quantities in grams, so I’ve been able to do a fairly accurate recipe using a full 9 oz. box. Also it uses vanilla, which I really like.

One more thing about Joy of Baking, it’s really great if you don’t know jack about baking. The recipes are tried and true, with lots of helpful hints. I’ve never had a recipe fail me yet. No affiliation, just a lot of gratitude from someone who had never even thought about baking a cake before having kids.


Traumatized Turkey Recipe


9 oz. box of Rice Krispies® cereal
5 tablespoons unsalted butter
Scant 1/4 teaspoon salt*
17 oz. (67 regular size) marshmallows
1 teaspoon pure vanilla extract

16 oz. of chocolate (dark, semi, and/or white, whatever you prefer)
Mini M&M’s
Candy Corn

*Sometimes I forget the salt, nobody seems to notice.


Butter a large bowl and set aside.

Butter, a large pot. Melt the butter and salt in the saucepan over medium low heat. Add the marshmallows and constantly stir until the marshmallows have completely melted.

Remove from heat and stir in the vanilla extract. Add about a third of the Rice Krispies, stir until coated. Add another third and do the same. Take care with the last third that you don’t dump in the powdered Rice Krispie crumbs at the bottom of the bag. Stir until all the cereal has been coated. 

Pour the mixture into your prepared bowl. Measure a 1/4-cup of the warm cereal mixture and roll into a ball with buttered hands. You can keep measuring, but I suggest using the first one as a guide and just pull it off with your hands. Rebutter them as needed. I made 60 balls, some were a little a bigger, some a little smaller, who’s ever seen a flock of turkeys exactly the same size?

The fine people at Kellogg's say to place them on a wax-paper-lined baking sheet. Refrigerate about 10 minutes or until firm. That might have helped, we’ll get that in a bit, but the day before Thanksgiving my refrigerator did not have room for 60 turkey bodies and I didn’t feel like rotating them in shifts. 

What I did was gently smush their little bodies down with a cupped hand onto wax paper, to flatten their little bottoms. Kellogg's also says to impale them with lollipop sticks. I think the turkey has been demoralized and abused enough, I’m not poking a stick up its rear. Also I don’t get the obsession with putting everything on a stick. 

In microwave-safe bowl melt 4 oz. of the chocolate. Microwave for 30 seconds, stir, microwave for another 30 seconds and stir. 

If you want to learn about tempering chocolate you should probably go elsewhere. I’ve spent a lot of time reading about the suggested methods and then mostly ignored them. I don't finely chop my chocolate, I just break it into chunks.  Then I don’t melt the chocolate all the way in the microwave, there’s always a few chunks left swimming around. I just keep stirring, until all the chunks melt. Maybe not so much stirring as smoothing the chocolate back and forth against the bowl with the back of the spoon. I test the chocolate by dropping some on my wrist, if I can’t detect any heat it’s good, yeah just like testing a baby bottle in fact that’s where I got the idea. Which isn't a completely crazy idea, turns out it's a real thing.

Worst case scenario if you don’t do it right, your chocolate ends up looking a little chalky instead of smooth and shiny. Your real friends won’t care and they’ll still like you anyway. 

Dip each ball into chocolate, allowing excess to drip off. Return to wax-paper-lined baking sheet. 

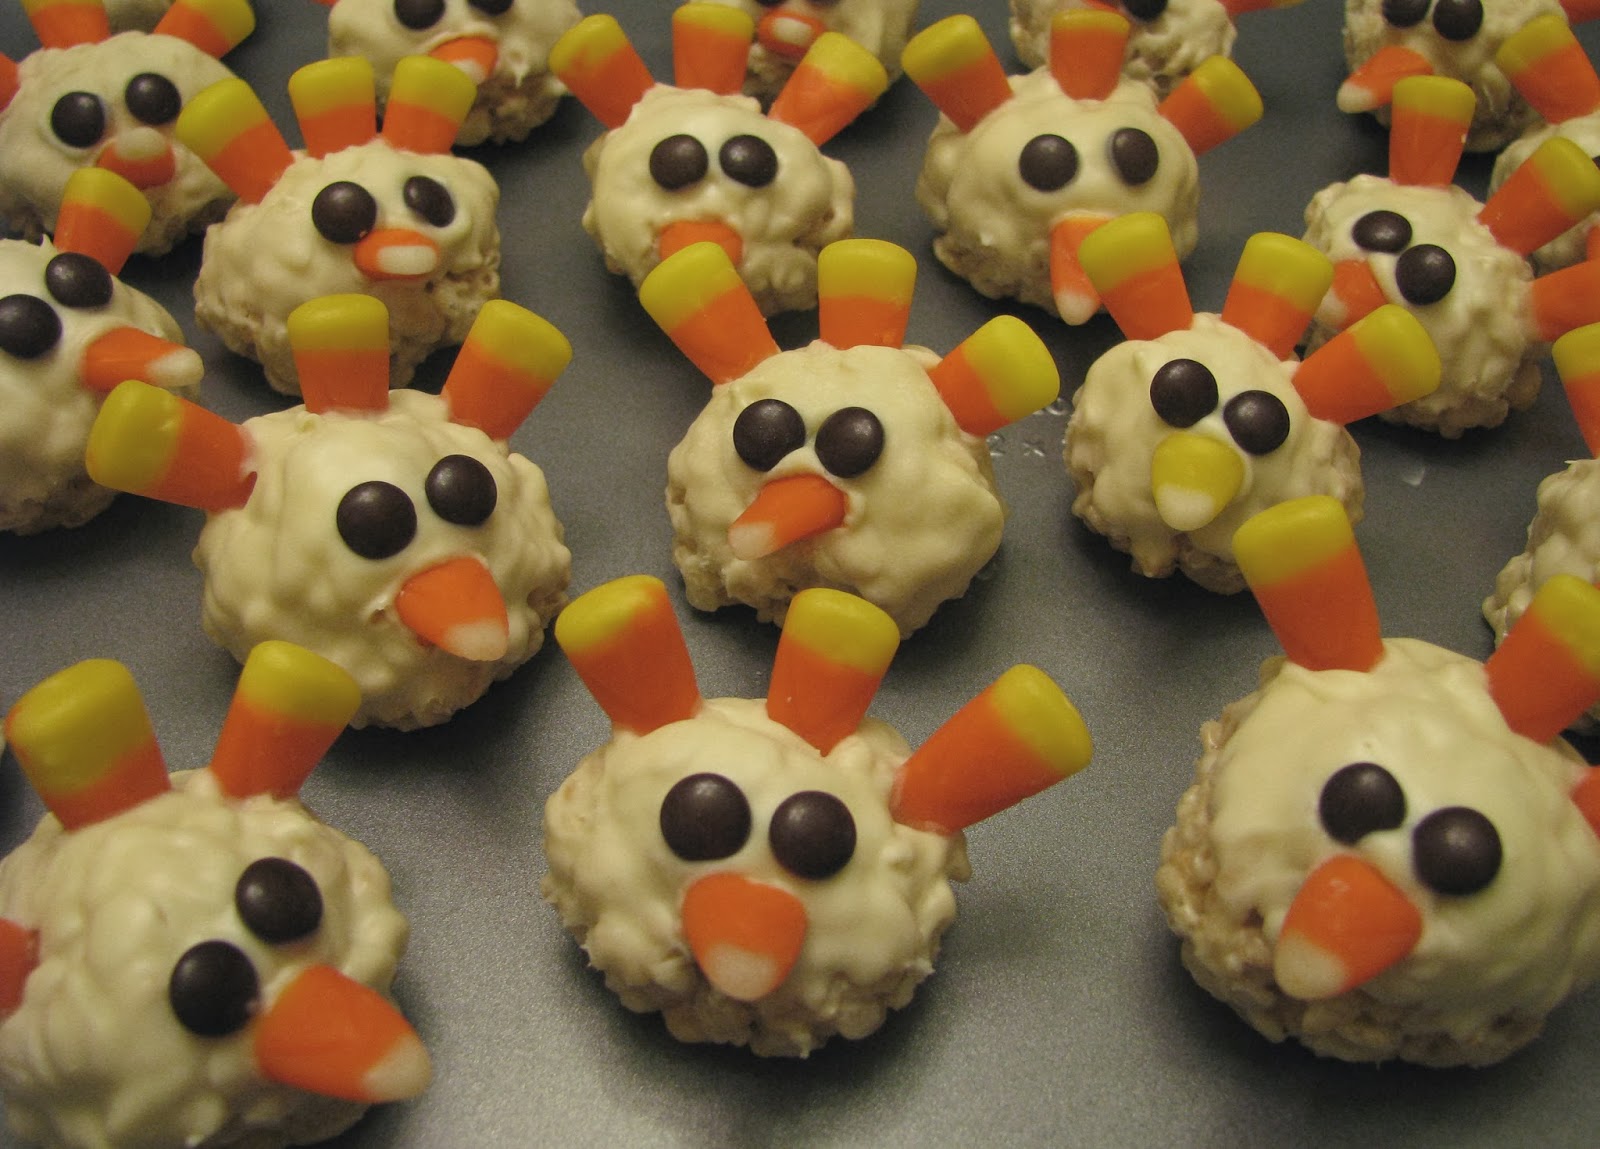
Again Kellogg's says, “Refrigerate for 5 to 10 minutes more or until chocolate is almost set. Decorate with candy corn for tail feathers and beak, gently pressing candy into chocolate and cereal mixture. Press in white candies for eyes. Let stand until firm.”

I dipped as many as I could with the 4 oz. of chocolate. I didn’t refrigerate, but did let them set about five minutes. While you’re waiting is a good time to trim the beaks. A whole candy corn gives you Cyrano de Bergerac looking turkeys, so I trimmed off about a third. Then you can try putting your M&Ms on, if they stay, you’re good. If they slide down, you need to wait. I did all the eyes first for that set of turkeys.  By the time you've finished the eyes the chocolate has set enough that the beaks will stick.

Here’s is my official technique for getting the stupid feathers to stick in without completely deforming the body (maybe this is where chilling them would’ve helped and then again maybe not), or accidently touching the chocolate trying to keep the buggers from moving around.

Insert the left and right tail feathers in at the same time, with even pressure, angling in just a tad towards each other. Press the beak into the chocolate in front while inserting the middle feather.

Most of the time this worked, some of the time bits fell off. I’ll address that later. Then I continued on working the turkeys in batches of whatever I could coat with 4 oz. of chocolate.  Doing them in smaller batches keeps the chocolate workable. I guessed at how much total chocolate is needed to cover 60 turkeys, because some of my bodies disappeared before I could coat them. There seemed to be quite a few feathers and eyes that vanished while I wasn’t looking also.

So to glue on falling off bits I heated up some red candy melts.
Here are my Traumatized Turkey masterpieces.


You can use the candy melts for good instead of evil. I made a cute little snood for this guy. Sadly he is seconds away from being pecked to death by the bloody beaked, red eyed zombie turkeys


Besides the turkeys, we brought a little Creepmas to Thanksgiving this year. I almost feel bad, because Thanksgiving really got shafted this year. I say almost, because if I really felt bad, I wouldn’t have done it.

It’s not every uncle that can truly appreciate the wonder and joy of a musical armpit farting animated zombie, but my kids are lucky enough to have such a one, so when they saw this they knew they had to get it for him. It worked out that wouldn’t see him until Thanksgiving and since that would be a weird Thanksgiving gift, we decided it should be an early Creepmas present.


Most of the family members we see at Thanksgiving we don’t get a chance to see again until spring or even summer and to deny them the tasty pleasure of my brains, seemed wrong. I also made cookie dough filled eyeballs and truffle surprise filled bugs.

I wasn’t completely sure how that would go over, but everyone enjoyed them. The kids (and not just the ones of my own that I’ve warped) were really excited to see eyeballs at Thanksgiving. I think I saw the pumpkin pie getting a little jealous at all the attention they were getting.

I’m thankful to have an extended family that doesn’t mind my quirks.

I’m also thankful my kids don’t have gumballs, a synthesizer and a 12 inch metal spike.


Thursday, November 21, 2013

Disco Pumpkin


I lack the photography skills to adequately show just how awesome this pumpkin is, so you’ll just have to do your part and use your imagination or better yet make your own because it’s super easy.  What makes this pumpkin extra special is it’s illuminated with a color changing LED light. Here are a couple of stills of that color changing awesomeness.


I bought the Pumpkin Masters Star Studded Pumpkins kit years ago. According to this website it was released in 2004, which sounds about right.  It came with this handy dandy little tool, but I’m sure a drill would work just as well, probably better. 


In this video they use a drill and real pumpkins, and show some neat designs.


To make a pumpkin like mine you will need a fake pumpkin, white paint and other assorted paints, clear marbles, drill or other tool of choice to make holes, color changing LED light and again your tool of choice for carving out the bottom of the pumpkin. 
 

Start by carving an opening in the bottom of your pumpkin. My light isn’t very thick, so by making the opening more of an oval shape, I can insert it sideways and then once it’s lying flat it doesn’t fall out. I like to move things around.  Making a hole wide enough that you can set your pumpkin over your light source works too.   
 
Paint the inside of the pumpkin white.  I like spray paint for this. I used a pumpkin from Michael’s without any problems, but spray paint can eat into foam, so another brand might react differently.  Just something to keep in mind.  The reason for this step is so your light colors stay true and don’t reflect the orange hue of the pumpkin.  It makes a big difference, I speak as one who had to pop all the marbles out and paint a pumpkin full of holes after the fact.

After the inside is painted, then paint the outside however you like.

Mark where you want your holes.  Then poke, scrape, twist, drill, use the force or whatever your method of choice is to make holes.  Just don’t make them too big, you want the marbles to fit snug.

After you’ve made a hole you can give the marble a little twist to wedge it in. I think it looks best when the marbles are sticking halfway out, they look really cool when they light up. I also like the look of using different sized marbles.

That’s it, light it up!

Saturday, November 16, 2013

Bailey’s Skull


You can find the original recipe for Boris O'Sanchez's Hand here. 
It’s basically a white Russian jello.  
 
I made a minor change, because the “vanilla flavored coffee creamer” scared me.  I hate vanilla flavored stuff that doesn’t taste anything like vanilla, and I wouldn’t have a clue as to who makes a good vanilla creamer.  So the following is based on a creamer recipe that showed up repeatedly on Google from multiple sources.
 
I had a skull mold instead of a hand, and the recipe only half filled it, but I kind of liked the way it turned out. My skull looks mottled because I let it cool a tad too long before stirring in the alcohol. 
 
 
Ingredients:

1 tablespoon plus 1 teaspoon unflavored gelatin powder
3/4 cup milk
3 oz sweetened condensed milk
3 oz half n half
½ tsp vanilla
1/3 cup vodka
1/3 cup Kahlua
1/3 cup Irish cream liqueur

Directions:

Makes 2 1/2 Cups

Prepare the mold by following instructions on the mold package and place in a bowl for stability.

Pour milk, sweetened condensed milk, half n half and vanilla into a small saucepan. Mix until the condensed milk is incorporated and sprinkle with gelatin. Whisk the mixture well, then let it sit for 3 minutes.

Place the pan over medium heat and bring to a simmer, whisking frequently to insure that gelatin dissolves.

Immediately remove the pan from the heat, pour contents into another bowl and let the mixture cool for about 20 minutes. Stir in the alcohol.

Stir well and pour into the prepared gelatin mold. Chill until firm -- at least 4 hours.

To unmold, dip the bottom of mold in a bowl filled with hot water, taking care to not let any water get into the mold. Dipping the mold for a few seconds helps to loosen the gelatin from the mold. Remove from water and dry off the bottom of the mold. Place a serving platter over the bottom of the mold and flip both over. Carefully remove the mold from the gelatin.

Update: First time around I didn't coat the mold with cooking spray.  Since then I've purchased some coconut oil cooking spray and it makes it so easy to pop the gelatin out, no dipping in hot water required. Coconut oil does solidify when it gets cold, if you look close you can see some flakes of it on the hand below.  Flaky skin doesn't bother me, but I thought I'd mention it.   

I've also taken to leaving out the vodka and just adding more Kahlua and Baileys.  I don't get vodka, I'd rather have a Kahlua and cream, than a White Russian.  For all I know vodka is the MSG of the alcohol world and that's why it's in so many mixed drinks and I'm just missing out on this incredible flavor enhancer, but I can live with that. I also think swapping out a couple tablespoons of alcohol with chocolate syrup might be fun for a Mudslide version. 

I picked up some Wilton zombie hand molds this year.  They looked awesome and are a nice serving size, rather than having to cut up a big mold.  The downside is each hand holds less than a tablespoon of liquid, so you'd need a lot of molds to do all hands.  I snagged a bunch on clearance after the holidays. 


Thursday, November 14, 2013

Craft Party 2013


Just getting around to sharing a few pictures from this year’s craft party. It actually takes place the 1st or 2nd weekend of October every year. I generally suck at remembering to take pictures, but each year I try to suck a little less.

I love watching creativity spread like a mutant virus, seeing ideas take hold and twist and contort into something different with each new mind they infect. 
 
 
Much like what happened with this pretty little ghost, that was inspired by ghosts that we had hanging around, that were inspired by our toilet paper roll mummies that were inspired by other tp mummies on the internet, that worried the cat, that killed the rat, that ate the malt, that lay in the house that Jack built. 
 
 
These awesome heads were inspired by last year’s skull beads and in turn paved the way for voodoo dolls that hopefully I’ll get a tutorial of made soon.  
 
Here are a few more creations, unfortunately in the chaos I didn’t get around to photographing everything, so you won’t get to see the zombie arm or furry graveyard, among other things. 


This was the only potion bottle I got a picture of, but the glittered potions were a big hit this year.  This one doesn't contain any glitter glue, that's a couple of sticky eyeballs with glitter stuck to them.


I found this awesome Cthulhu coloring page at Yucca Flats, N.M. Be sure to check out the other coloring pages available.
 
 
I also had copies available of the FaceOff template from Skull-A-Day.  I was so close to the exhibit at the International Museum of Surgical Science this summer. But the day wasn't about me, and a little girl and her grandmother had a fabulous time at the American Girl Place where there was nary a skull to be seen, except for my skull bag. So I added a little skull appreciation into the party and my guests did not disappoint. Yes that last one has nose hairs. 

 
There were other skulls, which try as I may, I can not find the original source for and the ever popular dancing skeletons.


And more bead creatures...
 
We also gave out the best door prize ever this year, dried froggy roadkill. Of course I didn't get a picture of it, because I suck. 
Two summers ago the neighbor girls found a dried frog.  I think it's state had a lot to do with the drought that year.  It was almost in mint condition, all the bones were intact, the skin dried to a perfect froggy leather.  They were going from house to house showing off their find to gross out all the parents.  But to their surprise and why they were surprised I don't know, they know me better than that, instead of shrieks of disgust, I merely said, "Cool, can I have it when you're done with it?"  The darlings gifted it to me on the spot and no sooner had I put it in a jar than my husband piped up and said, "You're not bringing that in the house."  He thought it was going to rot and stink and attract bugs, he was very unreasonable and wouldn't even look to see how well preserved it was.  So I left it on the porch.  A few days later I went to admire it and it was gone.  It was a dark day in our marriage, I can't think of the last time we had such a heated argument prior and we haven't had another like it since.  The betrayal of having one's dead frog tossed in the trash, along with a very nice recycled jar, on a trash day no less with no chance of retrieval behind one's back is practically unforgivable.
This summer the girls found another frog. It was not in mint condition, it had been run over and then dried out on the blacktop, but still a very lovely gift.  I couldn't bear to go through all the turmoil and heartbreak again, so I decided the only thing better than having your own dried frog, is sharing a dried frog with friends. 
But the best part of this year's party was as people were leaving they were already talking about what they want to make next year.  That just warms my cockles*.  And not because I feel in some small way I’ve helped to facilitate a rich nurturing environment in which creativity can flourish.  No, it’s because the more people I get addicted to creepy crafts, the less crazy I seem. 
*A saying which doesn’t mean what it sounds like it should mean to my great disappointment, but I’m not one to let facts get in the way, so feel free to imagine my warmed cockles however you wish.