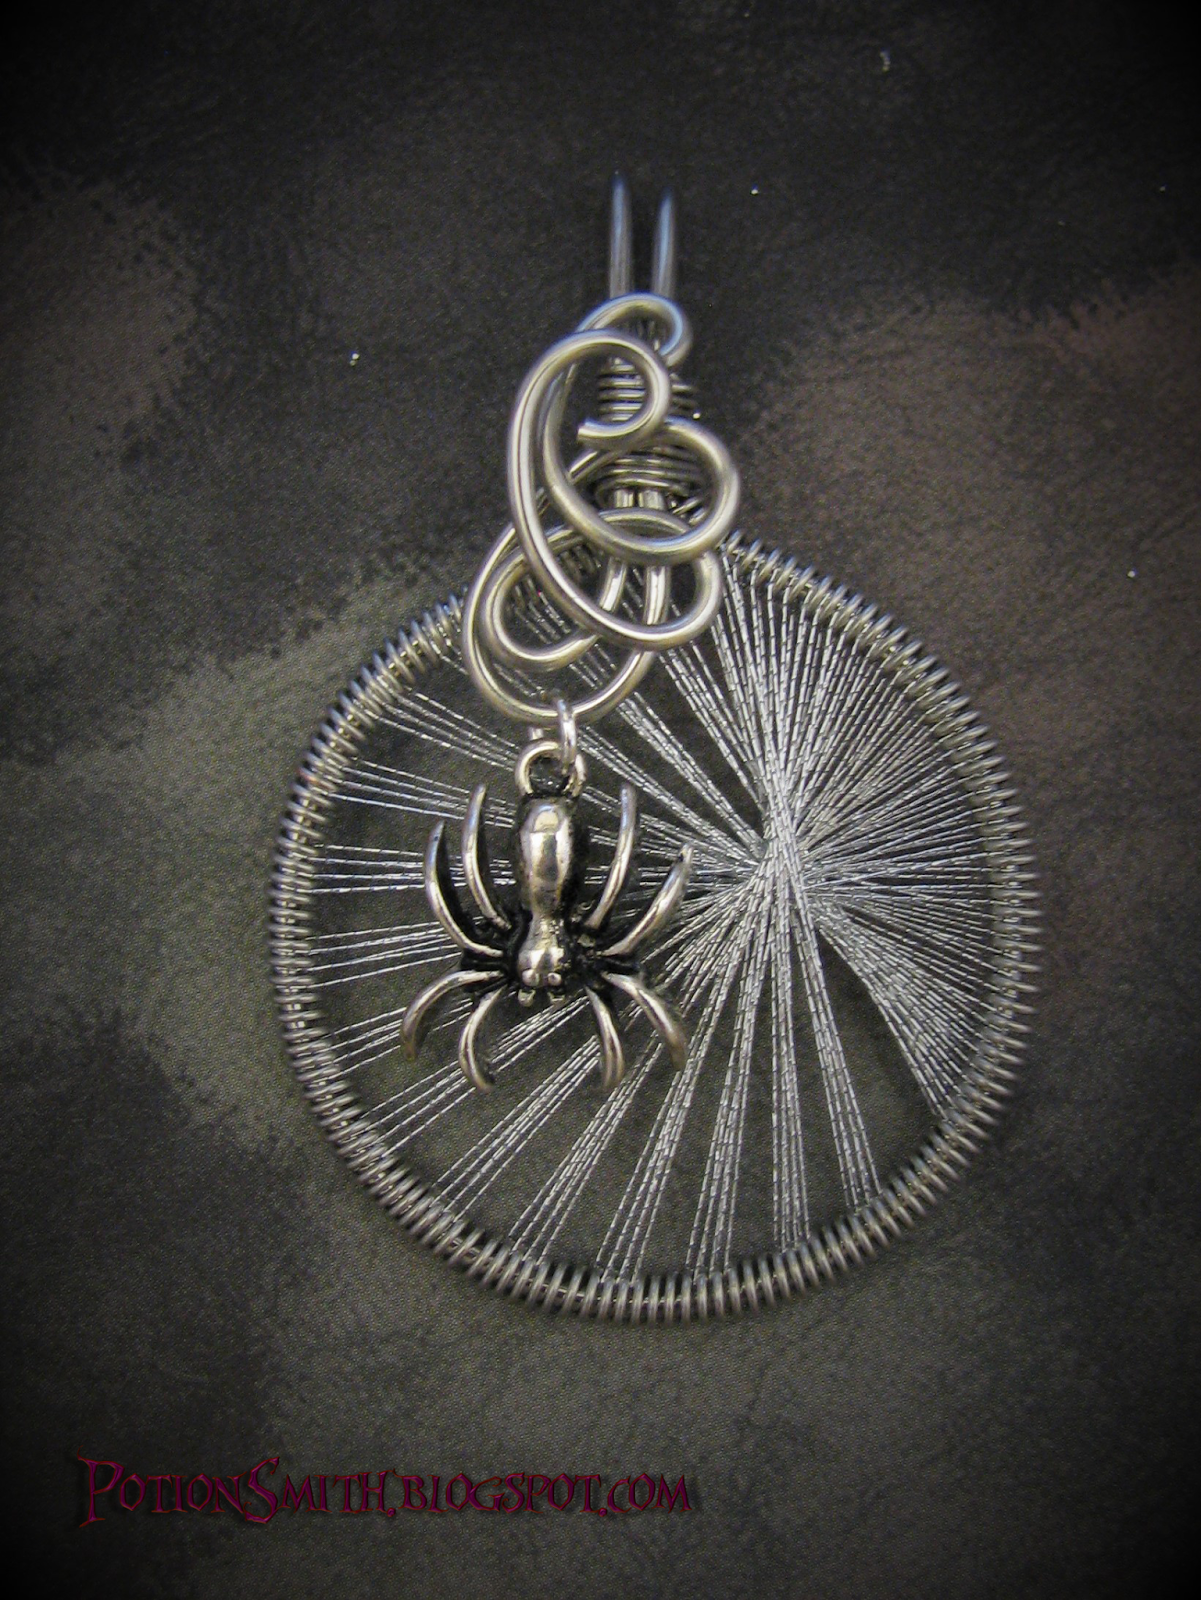
While researching another project I accidentally fell down a rabbit hole that started with string art and ended with Peruvian thread earrings. This is what my brain spit out in the aftermath. I think it looks spider webby, but then any threaded pattern always makes me think of
the masters.
If you find videos to be helpful there are a ton of them, but I found this one by
Camille Sharon to be the most useful when I started out. She gives a lot of detailed information that other videos skip over.

The thing about the Peruvian thread earrings is that they are very symmetrical. Nothing wrong with that, I'm just more asymmetrical. The pendant above was inspired by the left-hand picture from
mathcraft.wonderhowto.com. Math sites have some of the coolest patterns like the Yin Yang at
artofmathematics.org. Not every pattern is going to translate well. There are some angles that are not going to hold with thread and coil like they would with string and nails or pen and paper, but its fun to play.
To get started you'll need a few things:
Wire coiling gadget - You can make your own. I bought a simple coiling tool with two rods. I screwed mine to a piece of 1x4 board, a little clunky but portable, since I do most my crafting on the go. I've seen 5 rod kits going for $10, which with a craft store coupon is pretty inexpensive. I've still only used the small rod in my kit, so that probably would be overkill for me.
Thread - Starting out I followed the video I mentioned and used separated embroidery floss threads. Some projects use the embroidery floss as is. I think separating the individual strands looks a lot sleeker. My daughter happened to have a bunch of colors from her friendship bracelet phase, so it was logical to use what was on hand. The upside to embroidery floss is you can get a wide assortment of colors for a small investment. The downside is separating the threads. I would cut an arms length of floss and separate the threads and even at that length, it wasn't the most pleasant experience. And an arms length doesn't get you as far as you might think. I needed at least 2 or 3 lengths to complete a pendant, which means more loose ends to be tied off.
Once I decided this was going to be a thing, I invested in a few spools of metallic thread. My colors are limited right now, but life is so much easier. Using any old spools of thread you have laying around is a great option for experimenting with different patterns.
Wire - For this project I recommend using inexpensive craft wire. Not to plug Michaels, but I've been very happy with their Bead Landing wire. For this pendant I used 16 gauge wire for the frame. 14 gauge would be even sturdier for the frame, but harder to make the decorative loops at the top. 18 gauge is easier for the decorative loops, but not as sturdy for the frame. This pendant also uses 24 gauge for the coil. 22 or 26 gauge would also work.
Glue - This is one thing I don't have a good answer for. I usually default to E6000 for jewelry things. I hate using that stuff, but for the times I need it, I haven't found anything that works better. This
video uses fabric glue, which sounds interesting but I haven't tried it. I did try Gem-Tac, which I have on hand, applying it just to the knotted ends. I like the smell and consistency better than E6000. I haven't field tested it yet. [When my daughter was younger I'd let her wear my jewelry on the playground to weed out points of failure, sadly as a tween she doesn't want to be my guinea pig anymore] So I can't say if it will truly keep things from unraveling over time. I would advise against using super glue or nail polish.
Other tools:
Round nose pliers
Needle nose pliers - Only flat pliers, no teeth, they leave marks.
Flush cutter - If you are going to do any wire work, get a good flush cutter. It does just that and makes a flat clean cut. Note: Do not ever never ever use a flush cutter on fully hardened wire (like memory wire) it will ruin the blade.
Nylon pliers (optional) - Nylon pliers are useful for straightening wire. I also like using them for holding wires while wrapping or making minor adjustments without leaving marks.
Embroidery scissors (optional) - They have a nice fine point for trimming threads and if that's all you use them for, they will last for ever.
spider charm (optional)
small jump ring (optional)
So lets get started. Begin with a 12 inch length of 16 gauge wire. One thing I forgot to mention was a round object to form the shape of your pendant. Now I'm using some pretty high tech equipment here, so try to keep up. This is a thick cardboard tube. It's about 4.25 inches in circumference and one inch diameter. The finished pendant will be 1.5 inches across.
Wrap the center of the wire around the form leaving equal amounts of wire sticking out at each end. After wrapping it around I like to mark where the wire meets with a permanent marker to use as a guide later.
Here is my fancy wire coiling setup. Hold the working end of the wire straight and tight as you turn the handle. If you have trouble sliding the coil off the rod, twist the ends in the opposite direction to loosen the coil. I prefer to stretch the coil out when it's still on the rod. I can see the spacing better and adjust it without doing wonky things to the shape of the coil. You might find it easier to just take it off the rod and pull the ends.
I'm using about 5 feet of 24 gauge wire for a 3 inch coil with an 8 inch tail. The closer together the coils are, the more anchor points you have to create your pattern, but you don't want the coils too tight. It's hard to think of thread as taking up much space, but it adds up. Thread thickness and multiple passes affect how much space is needed in-between the coils also.
For your first few pendants, I recommend measuring the circumference of your pendant and making a coil half that size. After it's fully stretched that comes out to about 10 coils per centimeter. That will give you a nicely spaced coil that's not too tight, not too loose. The one shown below is a little tighter about 15 coils per centimeter.
Feed the coil onto the 16 gauge wire. Remember those marks we made? Use them as a guide and bend the 16 gauge wire at about a 90 degree angle from the pendant circle. Make sure the ends of the 16 gauge wire lie flush against each other and tightly wrap each end of the coil around twice.
Hold the 16 gauge wire right above the coils with the needle nose pliers and bend the wire back at a 90 degree angle.
Bend it into a loop. I find it easier to work it into a curve with my fingers, but you could wrap it around the thicker end of your round nose pliers.
Run the shorter end of the 24 gauge wire up the back, where it will be hidden by the wire wrap. Press the ends of the 16gauge wire down so the wires lay neatly against the bottom neck of the loop and wrap the longer end of the 24 gauge wire around the whole thing. Trim the ends of the 24 gauge wire and tuck them away.
Twist the remaining 16 gauge wire however you want, or more correctly however the wire wants. Start with the base of the wire and work your way out to the ends using just your fingers at first. I only use the round nose pliers at the very end to curl the tips.
Make life easy and don't try to force the wire to fit a specific design but rather follow where it wants to go. Even if you mess up, don't try to fix it, you'll just make it worse. When it's all done you just might surprise yourself and end up liking your "mistake". Worse case scenario, you can always cut off what you don't like and curl the end. You can also start with a shorter wire if you don't want a big swirly loopy mess and make simple short loops or coils on each end.
Now having that big swirly mess out front is a little bit of a hindrance that you'll have to work under, but you want to have all the wire work done before you start wrapping the thread.
Tie the thread using a
surgeon's knot. Whenever possible I like to start at the top where it will be hidden. Then start wrapping. You want the thread to be snug, but not tight. Too much tension and you can pull the wire out of shape. Knot the end when you are finished. If I end in the same spot I finished I'll also knot the two ends together. Trim the ends and add a dab glue to the knots.
You can leave it as is or attach a charm to one of the loops with a small jump ring.
Here is what the pattern looks like on paper starting with the purple, then red, green and blue.
Sometimes it's nice to sketch things out. I find it especially useful when comparing subtle variations.
Here's the blank template I used.