Friday, November 18, 2016

Punk Skeleton Vulture


Punks Not Dead, well maybe a little decomposed. 
If you've been following along, after the craft party I meant to make a punk skeleton and ended up going glam rock.  Not to be denied my desire for punk and bones I channeled all that energy on this guy. 

Here he is before his transformation, which consisted mainly of
tissue paper, paint, feathers, a few beads and pieces of an old belt. 


This is from behind obviously. 


And here he is with a pumpkin I got on sale at the beginning of October,
which probably has a lot to do with my mindset this season. 

Wednesday, November 16, 2016

Zombie Guts Recipe

I use the basic dough from this Sun Dried Tomato Focaccia recipe for everything.  It's a tasty focaccia as written. It's also good with herbs tossed in the dough or spread with pesto before covering in cheese.  I use it as a pizza dough, deep dish in a pan, hand tossed or rolled thin. I use it monkey bread style either with cinnamon and sugar or garlic salt and parmesan.  (See recipe variations at the end.) And I use it to make cinnamon rolls.  On Christmas morning cinnamon rolls look like cinnamon rolls, but around Halloween they look like intestines. 


Before we get started I would like to say that I would never ever tell you to eat raw dough, in fact I would say don't eat raw dough.  Because it clearly states on the bread flour bag in bold capital letters "DO NOT EAT RAW BREAD DOUGH" and it would be reckless insanity to go against boldface warnings.  Now that I've covered that, my grandmother would make fresh bread and cinnamon rolls every Saturday morning and I would beg her for raw dough.  She would give me a look, like something was fundamentally wrong with me, because no one in their right mind would eat raw bread dough. She'd sigh and shake her head, like it was against her better judgment, but she always gave me a little dough ball.  So every time I make dough, the family gets a bit of raw dough and it's delicious and no one has even died from it. 


Zombie Guts

Dough:
1 cup water
3 cups bread flour
2 tablespoons dry milk powder
3 1/2 tablespoons white sugar
1 teaspoon salt
3 tablespoons butter at room temp
2 teaspoons active dry yeast

Coating:
1/2 cup melted butter
1 cup fine white sugar*
2-4 tablespoons ground cinnamon**

Glaze:
2 tablespoons melted butter
1/2 cup powdered sugar
2 tablespoons milk or cream
1 teaspoon vanilla

Preheat oven to 350F.  Lightly butter two 8 inch round pans.

Place water, flour, powdered milk, sugar, salt, butter and yeast into bread machine in the order suggested by the manufacturer ***. Set to Dough cycle, and start the machine. Dough will be 1/2 pound.

When the bread machine has finished the Dough cycle, take the dough out. Knead for 1 minute by hand. Place in an oiled bowl, and turn a few times to coat the surface of the dough. Cover with a damp cloth, and let rise for 15 minutes in a warm place. (An easy way to check if the dough has finished rising is to poke it with your figure, if the dent stays it's good to go.)

Mix the cinnamon and sugar together in a medium sized bowl and set aside. 
Roll the dough out into a 12x18 inch rectangle. Use a pizza cutter to cut it into 16 strips lengthwise.  Dip the strips one at a time first in the butter, then in the sugar mixture to coat.  Randomly place 8 strips in each pan. You want them to squiggle all over the place, but at the same time try to make sure the dough is evenly distributed across the pan.  Let them rise again for 15 minutes. 


Bake at 350 F for 15 minutes or until slightly golden on top. 

In a small bowl slowly add powdered sugar to the melted butter. You should end up with a thick paste.  Add the vanilla and stir until smooth. Smooth out any lumps with the back of your spoon. Add 1 tablespoon of milk and again stir until smooth.  Slowly add more milk a little at a time until it's thin enough to drizzle.  Drizzle over the intestines while they are still warm.  This step is important so the glaze melts and soaks in.  This makes the intestines shiny. If you wait until they are cool, it just looks like frosting sitting on top, well because that's what it is. 


*A half and half mixture of dark brown and white sugar will make darker intestines. 

**The amount of cinnamon depends on type, quality and personal preference. Varieties labeled Saigon or Vietnamese have more kick than "regular". I like a lot of cinnamon, not only for flavor but color. 


***My manufacturer instructions are pretty simplistic, the following is what I do base on information I gleaned from somewhere a long time ago: 

Unless I'm opening a new jar of yeast, it's coming from the fridge so I measure out what I need and let it come to room temperature.  I microwave the water for 30 seconds, you want it warm, but not hot. Water goes in first.  I sprinkle the first two cups of flour so it sits on top of the water.  The last cup I dump in the center and make a well.  The yeast goes in the well.  Salt and sugar go in opposite corners.  By default I put the butter and milk powder in the remaining corners.  Start the dough cycle and check it after about 5 minutes.  My machine always has a bit of flour in the corners that needs a little nudge to get incorporated.  Let it go a few more minutes until everything is well mixed and look at dough again.  If it's too wet add one tablespoon of flour, too dry add one teaspoon of water. 


I'm still working on achieving bloodier intestines without compromising taste.  One time I added red food coloring to the glaze, but I hate the taste of food coloring, so I only added a little.  Pretty pink intestine are not scary or gross.  Ok they are scary and gross but for all the wrong reasons.  I made a clear glaze once but that bored my taste buds so I didn't use it.  I've seen intestines done with cherry pie filling, but then it becomes something else and is no longer a cinnamon roll. Maybe a light drizzle of a dark berry sauce or heated jam would look nice without overpowering? Or possibly a brown sugar butter glaze with a drop or two of red coloring.


Real quick, here are other things to do with this dough. 

Cinnamon rolls are almost the same as intestines except I use half the amount of butter, sugar and cinnamon.  After rolling out the 12x18 rectangle, spread on 1/4 cup of soft butter and then sprinkle with 1/2 cup sugar (I use a mix of brown and white) with 2 tablespoons of cinnamon. Roll it up and cut it into 16 even slices, place 8 on each pan.  Let rise and bake same as the intestines.  This time let them cool prior to adding the glaze. 

When I use it for pizza either hand tossed or rolled I bake it at a higher temp of 425 F for 10 minutes.  Can't remember the time when using it pan style it's been too long. 

Remember Domino's Pizza Dots? These are similar, better if you ask me.  Usually when I make dots I make one pan of cinnamon ones and the other ones cheesy.  After the dough is done rising split it in half.  Set one half back in the bowl and cover it up so it doesn't dry out.  Keep dividing the remaining half until you have 32 pieces.  Melt 1/4 cup butter.  Mix 1/2 cup sugar with 2 tablespoons of cinnamon.  Dip each piece of dough first in the butter, then in the sugar mixture and place them in the pan.  For the cheesy dots grate or finely shred 1/2 cup of parmesan and mix with a 1/4 teaspoon garlic salt. Divide the other half of dough into 32 pieces.  Melt 1/4 cup butter.  Dip the dough first in the butter, then the cheese and place in the pan.  Bake them at 350 for 12-15 minutes or until done. Another variation on the cheese dots its to wrap the dough around a small chunk of mozzarella, make sure the edges are pinched shut and then dip in the butter and parmesan. 

Here is a label for Zombie Guts.  The font is A Lolita Scorned by Angeliq.

Friday, November 11, 2016

Craft Party 2016


This October marked the 9th year of official Halloween craft parties. It's a lot of crazy, but magic happens when you throw a bunch of people in with a bunch of stuff, stir in some glue and sprinkle on a little glitter.  I love seeing everyone feed off each others ideas. It's like being in a vortex of creative energy.

Sadly I didn't get pictures of everything.  I never do, there's so much happening at once, it's hard for me to keep up.

As we do every year, there were potion bottles.  Bottles with labels...

Both this poison label and the one in the first picture are from SpookShows.com. Life Renewal Potion label from Love Manor.

bottles without...


The bottle below is one of my favorites, staring at the line between the light and dark red was like looking off into the horizon of a red alien landscape. 
Someone said it looked like a core sample from Mars. 


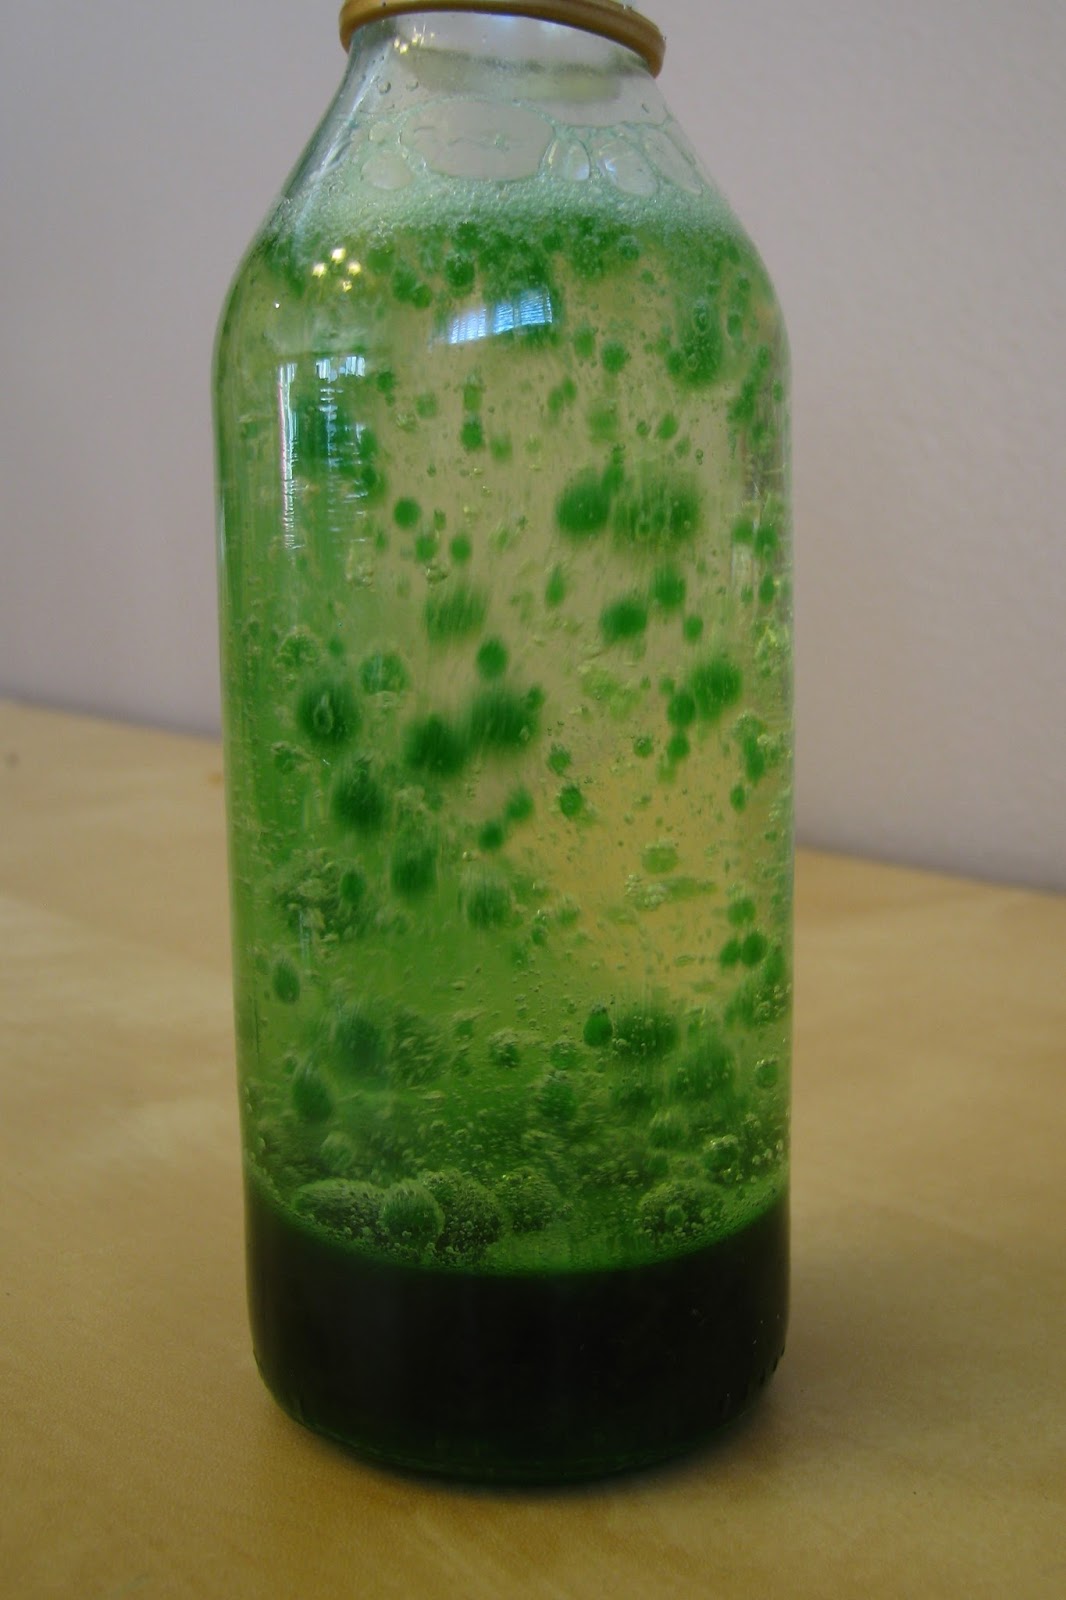
Last year we discovered that if you add glitter to a bottle of water
with a little oil in it the glitter sticks to the oil and takes on
a globular life of it's own when you shake it around. 


This bottle is kind of neat because there is too much glitter for the oil to hold,
so it has both the globular effect and loose glitter falling down when shaken. 


We also did lava lamp style bottles, which are a lot of oil
and a little water with alka seltzer tablets thrown in.
I wouldn't recommend adding glitter to these, it ruins the effect.


We used both corn oil and baby oil. 
Corn oil is cheaper, but yellow and baby oil is clear.

This one is pretty as is, but I wish I had a picture of when it was just plain water,
baby oil and silver glitter.  It almost looked like a storm cloud in a bottle. 


This year I made vampire blood.  Which is super cool, green under normal light, but glows red under UV. I used kale as they did in the instructions, but it's noted that anything green and leafy should work.

I have never eaten kale and after this I probably never will. Just blanching it for a minute smelled really bad, like old broccoli and even after pureeing the crap out of it the solid matter was really fibrous. It was not attractive. I'm just mentioning this in case you think you're going to tempt kids over to the dark side of kale by showing them how "cool" it is.  Cool, it is.  Edible, I think not. 


Anyway moving on, what to do with it? I tried lighting the "blood" from within with a submersible UV tea light.  It needed to be watered down so much for the light to come through that the effect is pretty blah.  Pictured above is full strength vamp blood on the left and watered down on the right, being lit from a source outside the containers. It's just a little strobe UV light, so it was hard getting a good picture. 


I kept the fibrous muck after I strained it out, because that stuff is cool too.  The chunky stuff isn't as bright, but this picture still doesn't do it justice. After it dried, it glow a bit less, but still enough to look cool.  Once it dried it didn't stink, it smelled a lot like alfalfa.


You can write or draw with the liquid and that looks cool too, but I don't have pictures.  Again it fades as it dries.  Maybe mixing with an acrylic glaze would help? Definitely need to experiment more. Like these glowing cupcakes from PhotoandGrime.com that use the chlorophyll from mint. Betcha mint smells better than kale.  I wonder if you can make minty vamp blood mojitos? Ok I definitely have to get down to the laboratory.  Igor? Where's an Igor when you need one?


I've been wanting to do papier mache at the party for awhile, but that's not a project that can be finished in a few hours.  So as a compromise, just to get some techniques introduced, we did simple stuff that people could at least get the foundation laid and then paint it on their own once it was dried. Here are some fantastic books my neighbor did. 

Here's a cute little pumpkin and some eyes before painting. Both are done on pieces of cardboard.  The eyes are glass gems over iris printouts from Orestesgraphics.com


And some random glass gems over magazine cutouts. 


I've been wanting to make tampon ghosts for ages, but the kids were so young I held off.  You can't really traumatize them if they don't get the joke.  But now that most them are in middle school, I figure the only thing worse than going through puberty would be tampon crafting with your mom. 

Tampons and I go way back, to when I was in middle school.  You know when dinosaurs roamed the earth and mullets and parachute pants were cool. In all that time I never noticed that they are made up of a bunch of really short fibers that fall apart when you futz with them. It may be unnecessary but I spray them with a little starch for longevity.  A clear acrylic spray would probably work well too. If you would like to read more about tampon construction than you ever really wanted to know check out my tampon angel.

I didn't want to add spraying starch as a parlor game inside my house, so for the party we just dipped them in starch.  A little liquid goes along way, so quick dips. My friend had the genius idea to wet the ends with the watered down glitter glue we had for potion bottles and then took it one step further to drop food coloring on the bottoms and let it wick up. Next time I would skip the starch and go straight to the watery glitter glue or maybe brush starch on the top and glitter glue the bottoms. 


I was inspired by her ghosts to make this tampon Cthulhu,
which I will write up a tutorial for, because everyone should
have a super absorbent Great Old One in their life.


The past few years voodoo dolls have been a party favorite. 
The girls love making fashionable outfits for them, so when I saw these ladies at Grandin Road, I thought we could do a similar thing with mini skeletons.


 They came up with some pretty amazing ideas. 


I was inspired to make this last skeleton while cleaning up after the party.  Scraps of this and that were laid out in such a way that the universe was practically begging for this to be made.  I started off with every intention of making a punk skeleton, but the scraps of pink neon lightning material (I have a friend who makes skate costumes, among other things, who donated some really neat stuff.), had other ideas and wouldn't leave me alone until I resigned to go 80's glam rock.

She's missing an arm because pre-party I played around with posing.  Soaking in boiling hot water was ok for minor manipulation. Snapping joints off and gluing into position looked the best, but leaves the joints very vulnerable, which is fine if you aren't going to mess with it much.  Obviously I messed too much and lost limbs along the way.      


We also made box mummies inspired by these but on a smaller scale.
Even though they look very similar we did things differently enough that I'll write up a separate tutorial. 


We did more foam bats this year too. 
Add a wire and you can stick them with your plants. 


We also made witch jars and other silhouette luminaries
No pictures but last year's post has pictures and links to silhouettes we used.


Food.  I'm obligated on penalty of death or at least torture by being tied to the tree of woe and licked by fire kittens to make rat and eyeballs every year. 
This year I went with diseased rat.  He did a fantastic job of oozing raspberry blood, I was very pleased.


I also made cookie dough brains, making the full cookie dough recipe without the cupcakes resulted in about 40 dough balls, which took about 16oz of white chocolate to coat enough molds.  These numbers are approximate because my kitchen is infested with ninja trolls that steal dough balls when I'm not looking. I made intestines, another recipe I'll have to post, and I tried these jalapeno mummy poppers, with a few modifications.  Instead of scallions and garlic, I seasoned them with chipotle powder and instead of salt & pepper I used a chipotle sea salt blend. The jalapeno's were a nice balance to all the sweet stuff. 


Guest contributions included Bat Barf, a meaty queso dip.  I didn't get a picture, but it was very barfy looking.  I did snap a picture of the tag, which makes me giggle, like only emoji barf can do.


On the sweeter side there were eyeballs,


bones,


witches hats and broomsticks,


graveyard cupcakes,


acorns,


and candy corn.


There's also a part that no one else gets to see. When the party's done, when it's quiet, when I can finally process everything...that's when I get some of the best ideas and I owe them all to the wonderful people who choose to share this day with me. 

Tuesday, November 1, 2016

Winter Squash & Roasted Seeds


Fall gently ushers in Halloween with silken whispers of rustling leaves.

As a kid one of my favorite things about this time of year was fresh roasted pumpkin seeds.  Now it's fresh roasted squash seeds. I love the smaller seeds and thinner shells. The problem is cleaning the guts off all those little seeds. I figured out a little trick this year to speed up the process.  It's so blatantly obvious after the fact, it feels like a stretch to call it a trick.  But if I've been doing it wrong all these years, I'm sure I'm not the only one and hopefully someone finds this useful. The trick is to scoop out the seeds first.  Just the seeds. Leave the stringy guts intact.  You can kind of pop them out with your finger pressing at the base of the seeds to disconnect it from the guts.  This is so much faster and cleaner than scooping them out together and then trying to separate seeds from guts.

Squash with seeds removed, guts still intact.

To roast them; I rinse them off, toss them with a bit of olive oil, spread them out on a sheet and sprinkle them with salt.  Lately I've been using this chipotle sea salt grinder for all of my savory salting needs.  It's great on roasted veggies and popcorn too. Since they are smaller they roast up pretty fast compared to pumpkin seeds. I roast them at 275 for about 20 minutes, stirring halfway through.

My favorite winter squashes are the Carnival, Delicata and Sweet Dumpling varieties picture above. They are all very similar in taste and texture, with mottled orange, green and cream colors on the outside. Small, sweet and creamy, I don't do anything fancy with these.  I cut them in half, scoop out the guts, bake them cut side down on a baking sheet (covered in parchment or aluminum foil for easy cleanup) at 350 about 40 minutes until tender.  Once they are cool enough to handle, I scoop out the squash add a bit of butter, salt (chipotle salt blend for a kick) and pepper. No brown sugar, like I grew up with on acorn squash, these are so deliciously sweet on their own.

Monday, August 8, 2016

Spooky Beach Fairy Garden


My daughter and I were invited over to the neighbors to make fairy gardens, this isn't one of them.  A gang of chipmunks vandalized ours, because chipmunks are little bastards.  Adorable little bastards, but little bastards nonetheless.  They literally left no stone unturned. No stone, no marble, no decorative whatnot. They even violated a fairy princess. Seriously guys is nothing sacred?

I salvaged parts from the originals, added in a few skeletal elements and moved it inside where it's safe. The fence is made out of hands that were a gift from another neighbor.  I've never thought of fairy gardens as a creepy medium, but now that I've had a little taste, I can totally see getting lost in the world of miniature gardens with zombies and tombstones instead of fairies and butterflies. First I'll have to see whether I manage to keep the plants alive. Then maybe I'll figure out how to make a skeleton lounging in a beach chair sipping a fruity cocktail.