I know I posted about the cartoon Billy & Mandy Save Christmas last Creepmas, but we just watched it again and I can't get over how wonderful it is.
It's the perfect Creepmas classic that you can watch every year and it's fun for the whole family. Ok there is a two second shot of Santa's whale tail where you might want to avert your eyes, but there's cookies and milk and vampires. There's nods to A Clockwork Orange, Rudolph the Red-Nosed Reindeer & and the Island of Misfits Toys, The Empire Strikes Back, Bram Stroker's Dracula and more. Besides the awesome main characters Billy, Mandy and of course Grim, they have some of the greatest voices, Malcom McDowell, Carol Kane and Gilbert Gottfried.
It's always on On-Demand on Cartoon Network every year and it's part of their Christmas 3 DVD. I also found it online here.
There is also a 'The Fright Before Christmas' game on Cartoon Network's site, I haven't actually played it, but I thought I'd still throw that out there.
Showing posts with label Grim Reaper. Show all posts
Sunday, December 7, 2014
Tuesday, December 2, 2014
Creepmas Fudge
♫ It’s beginning to look a lot like Creepmas
Death is at your door ♪
♬ And She’s handing out tasty treats
The kind you love to eat
With shiny skulls and finger bones galore ♫
I used the recipe for Simple Chocolate Fudge from JoyOfBaking.com. I've never made fudge before and this recipe lives up to its name, it's super easy. Also a good way to use up sweetened condensed milk if you have some left over from making brains. I only made a quarter of the recipe at a time. I've heard fudge sets really quickly, I don't know if that applies to 'simple' fudge, but doing molds takes a bit longer than just filling a pan and for my speed a fourth the recipe was just right before it started to stiffen.
So for a quarter batch you will need:
3.5 oz sweetened condensed milk
4 oz semi sweet chocolate
1/2 tablespoon butter
1/2 teaspoon vanilla
3 oz white chocolate (to coat the molds)
I cheated and put the condensed milk, chocolate and butter in a glass bowl and microwaved it for 30 seconds instead of using a double boiler and that worked fine for me. Stirred a bit until it was all melted and added the vanilla. I was a good girl and properly chopped up the chocolate, so I'm sure that helped the melting process, normally I'm pretty lazy about that and just break it into chunks.
I used Wilton's Skeleton Finger mold and the face half of their 3D Skull mold.
Coat the molds with tempered white chocolate. Read about Truffles the Rat, if you want my shtick on tempering. For the skulls I used a little less than a 1/2 teaspoon, for the fingers a bit more, about 3/4 teaspoon.
After the chocolate is set, make the fudge and fill the molds. I used a half tablespoon to fill the skull molds and a full tablespoon for the fingers. There was enough fudge to make 12 skulls and 6 fingers.
Cover the molds in plastic wrap and push the fudge into all the nooks and crannies and level it out. Refrigerate until set, about an hour.
Sunday, December 1, 2013
Zombie Creepmas Cupcakes
If Death comes knocking at your door…
…bearing cupcakes it must be the first day of Creepmas!

Our Creepmas cupcakes are a combination of quite a few recipes, so first let me give credit where credit is due.
Cherry Almond Muffin, Taste of Home - I loved the idea of a cheese cake center with red preserves. A tasty recipe in its own right that I've made before, but I didn’t think the almond crumble or the dense bottom were right for this project.
Zombie Cupcakes, Epicurious - I loved the look of the zombie hands, but fondant and gum paste doesn’t sound very tasty.
Sculptable Frosting, Sew Can Do - Sounded like it would make edible zombie hands.
Starburst Presents, Taste of Home - Festive and easy for the kids to make.
Vanilla Cupcakes, Joy of Baking - I used both the cupcake recipe and the buttercream frosting.
Disclaimer: I am not a baker. I have a few recipes in my arsenal that I’ve made often enough that there is minimal danger of me screwing them up. None of them show up in this project and I’m the last person that should be going rogue with a cupcake recipe, so continue at your own risk. The good news is you can make your favorite cupcake recipe and just slap a zombie hand and present on it and you’ve got your own Creepmas cupcake.
To illustrate my point, I thought it would be cool to pipe the jam into the center of the cheesecake mixture before baking, instead of swirling it. That didn’t work, it mostly sunk and made a soggy spot on the bottom of the cupcakes. (Sorryguinea pigs neighbors.) They were still tasty but I’ve corrected the recipe so no one has to repeat my mistake.
Vanilla Cupcakes:
1/2 cup unsalted butter, room temperature
2/3 cup granulated white sugar
3 large eggs
1 teaspoon pure vanilla extract
Zest of 1 large lemon (outer yellow skin)
1 1/2 cups all purpose flour
1 1/2 teaspoons baking powder
1/4 teaspoon salt
1/4 cup milk
Cheesecake Filling:
1 - 8 oz. package cream cheese, softened
1 egg
1/4 cup sugar
1/2 teaspoon vanilla extract
1/2 cup raspberry jam, warmed
Preheat oven to 350 degrees F and line 24 muffin cups with paper liners.
In a medium bowl beat cream cheese, egg, sugar and vanilla until smooth. Swirl in raspberry jam and set aside.
In the bowl of your electric mixer, or with a hand mixer, beat the butter and sugar until light and fluffy. Add the eggs, one at a time, beating well after each addition. Beat in the vanilla extract.
In a separate bowl whisk together the lemon zest, flour, baking powder, and salt.
With the mixer on low speed, alternately add the flour mixture and milk, in three additions, beginning and ending with the flour. Scrape down the sides of the bowl as needed.
Drop one tablespoon of cupcake batter in each muffin cup. Push it down a little, but it doesn’t need to completely cover the bottom. Divide the cheesecake filling between each cup, about a heaping tablespoon. Add another tablespoon of cupcake batter on top.
Bake for 12 – 15 minutes or until the cream cheese filling has set and the cupcakes feel springy to the touch (a toothpick inserted into the vanilla part of the cupcake will come out clean). Remove from oven and place on a wire rack to cool.
Buttercream Frosting:
2 cups powdered sugar
1/2 cup unsalted butter, room temperature
1 teaspoon pure vanilla extract
2 tablespoons milk
In an electric mixer, or with a hand mixer, cream the butter until smooth and well blended. Add the vanilla extract. With the mixer on low speed, gradually beat in the sugar. Scrape down the sides of the bowl. Add the milk and beat on high speed until frosting is light and fluffy (about 3-4 minutes). Add a little more milk or sugar, if needed.
Sculptable Frosting:
1/2 cup unsalted butter, softened to room temperature
1 tablespoon heavy cream
1/4 teaspoon real vanilla extract
3-4 cups confectioner's sugar
Green food coloring gel
Beat butter & cream in mixer until smooth. Adding a cup at a time, blend in the confectioner's sugar to create a dough consistency. Add vanilla and beat to combine.
Scoop out frosting to form a mound of "dough". Knead food coloring gel into frosting until color desired is achieved. If frosting seems sticky, add a small amount of confectioner's sugar until smooth.
Use 1-1/2 tablespoons of the dough to form each zombie hand. Epicurious has some nice pictures showing how to form the hands. I went with three fingers and a thumb, and just added a few knuckle lines. That's all I had the skills and patience for.
For the presents:
To assemble:
Frost the cupcakes and top them with a present and a zombie hand.
…bearing cupcakes it must be the first day of Creepmas!
Once again my daughter donned her Death costume, complete with Santa hat and candy cane striped scythe to help me kick off the Creepmas season. To see the full effect, check out our Creepmas card from last year.
This year we handed out cupcakes to our neighbors. One of my neighbors let me borrow her paper punches so I could make tags. This year I was smart and put the web link on the back so everyone will know where to go for more Creepmas fun.
We also did up some candy canes for friends we'll see later.
Our Creepmas cupcakes are a combination of quite a few recipes, so first let me give credit where credit is due.
Cherry Almond Muffin, Taste of Home - I loved the idea of a cheese cake center with red preserves. A tasty recipe in its own right that I've made before, but I didn’t think the almond crumble or the dense bottom were right for this project.
Zombie Cupcakes, Epicurious - I loved the look of the zombie hands, but fondant and gum paste doesn’t sound very tasty.
Sculptable Frosting, Sew Can Do - Sounded like it would make edible zombie hands.
Starburst Presents, Taste of Home - Festive and easy for the kids to make.
Vanilla Cupcakes, Joy of Baking - I used both the cupcake recipe and the buttercream frosting.
Disclaimer: I am not a baker. I have a few recipes in my arsenal that I’ve made often enough that there is minimal danger of me screwing them up. None of them show up in this project and I’m the last person that should be going rogue with a cupcake recipe, so continue at your own risk. The good news is you can make your favorite cupcake recipe and just slap a zombie hand and present on it and you’ve got your own Creepmas cupcake.
To illustrate my point, I thought it would be cool to pipe the jam into the center of the cheesecake mixture before baking, instead of swirling it. That didn’t work, it mostly sunk and made a soggy spot on the bottom of the cupcakes. (Sorry
Vanilla Cupcakes:
1/2 cup unsalted butter, room temperature
2/3 cup granulated white sugar
3 large eggs
1 teaspoon pure vanilla extract
Zest of 1 large lemon (outer yellow skin)
1 1/2 cups all purpose flour
1 1/2 teaspoons baking powder
1/4 teaspoon salt
1/4 cup milk
Cheesecake Filling:
1 - 8 oz. package cream cheese, softened
1 egg
1/4 cup sugar
1/2 teaspoon vanilla extract
1/2 cup raspberry jam, warmed
Preheat oven to 350 degrees F and line 24 muffin cups with paper liners.
In a medium bowl beat cream cheese, egg, sugar and vanilla until smooth. Swirl in raspberry jam and set aside.
In the bowl of your electric mixer, or with a hand mixer, beat the butter and sugar until light and fluffy. Add the eggs, one at a time, beating well after each addition. Beat in the vanilla extract.
In a separate bowl whisk together the lemon zest, flour, baking powder, and salt.
With the mixer on low speed, alternately add the flour mixture and milk, in three additions, beginning and ending with the flour. Scrape down the sides of the bowl as needed.
Drop one tablespoon of cupcake batter in each muffin cup. Push it down a little, but it doesn’t need to completely cover the bottom. Divide the cheesecake filling between each cup, about a heaping tablespoon. Add another tablespoon of cupcake batter on top.
Bake for 12 – 15 minutes or until the cream cheese filling has set and the cupcakes feel springy to the touch (a toothpick inserted into the vanilla part of the cupcake will come out clean). Remove from oven and place on a wire rack to cool.
Buttercream Frosting:
2 cups powdered sugar
1/2 cup unsalted butter, room temperature
1 teaspoon pure vanilla extract
2 tablespoons milk
In an electric mixer, or with a hand mixer, cream the butter until smooth and well blended. Add the vanilla extract. With the mixer on low speed, gradually beat in the sugar. Scrape down the sides of the bowl. Add the milk and beat on high speed until frosting is light and fluffy (about 3-4 minutes). Add a little more milk or sugar, if needed.
Sculptable Frosting:
1/2 cup unsalted butter, softened to room temperature
1 tablespoon heavy cream
1/4 teaspoon real vanilla extract
3-4 cups confectioner's sugar
Green food coloring gel
Beat butter & cream in mixer until smooth. Adding a cup at a time, blend in the confectioner's sugar to create a dough consistency. Add vanilla and beat to combine.
Scoop out frosting to form a mound of "dough". Knead food coloring gel into frosting until color desired is achieved. If frosting seems sticky, add a small amount of confectioner's sugar until smooth.
Use 1-1/2 tablespoons of the dough to form each zombie hand. Epicurious has some nice pictures showing how to form the hands. I went with three fingers and a thumb, and just added a few knuckle lines. That's all I had the skills and patience for.
For the presents:
Cut strips of Fruit Roll-Ups and wrap them like ribbon around Starburst candies.
To assemble:
Frost the cupcakes and top them with a present and a zombie hand.
I sprinkled on some white Wilton Cake Sparkles to give it that pretty new fallen snow look.
Merry 1st Day of Creepmas!
Tuesday, July 2, 2013
Death Om Nom
The next addition in the Twisted Om Nom's is Death. I don't draw much, almost never because I find it frustrating. My abilities and my aspirations don't exactly see eye to eye. I realize I'll never improve with that attitude, so these Om Nom's are my scary adventure outside of my comfort zone. With each one I find out just how much I don't know, like how to draw draping cloth, but it's fun trying. If you've seen my Sugar Skull Bunnies then you know I just recently discovered the world of converting sketches to line art following the basics of this video. Death is my first attempt at trying to use the inking technique that's demonstrated in the video. I think it does give the lines more character. I'm not sure how much I'll use it, but again it's fun trying new things. And here's one for you to color.
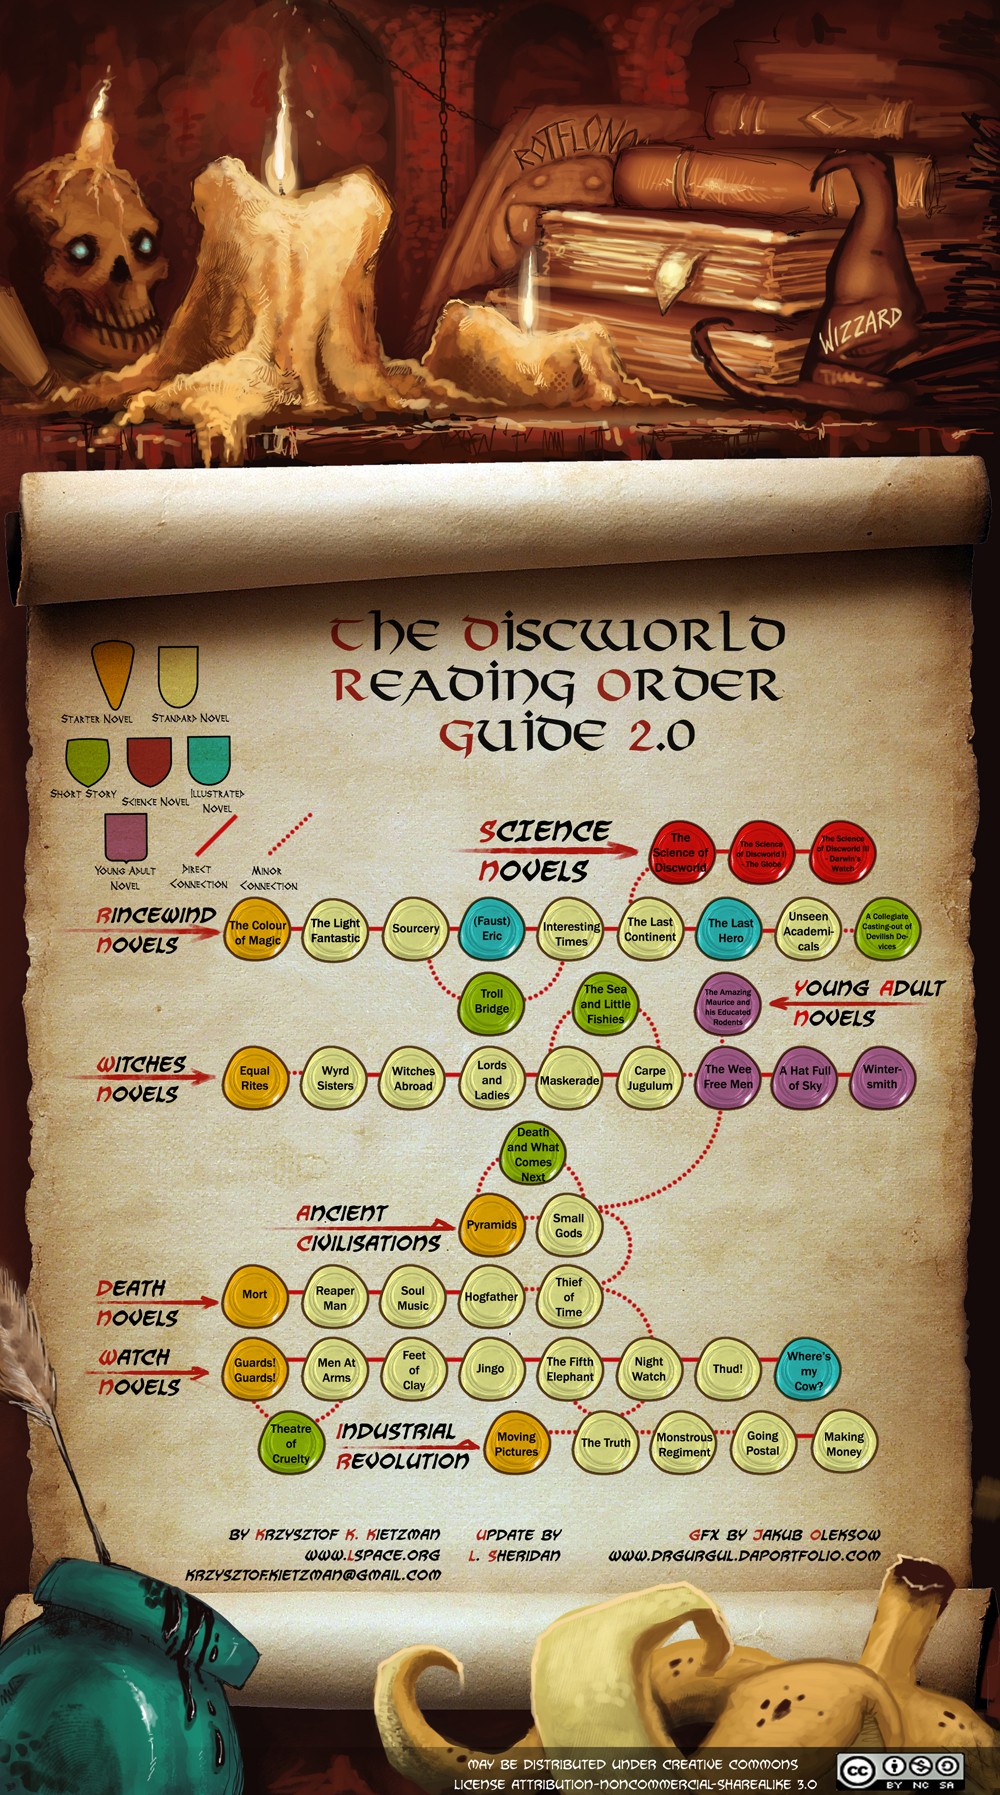
My favorite Death is from Terry Pratchett’s Discworld series. This is a great chart of how all the
Discworld books are laid out.
I can’t mention the Grim Reaper without writing about my son’s
brush with Death. Last fall one of the
state parks hosted a night hike. Little
did we know as we set off, how close we would come to Death that evening. But on
our way back to the main shelter we saw Him. Lurking amongst the groups of
hikers, He never mingled or spoke a word, just silently skulked around the fringes. No matter how hard people, however unwisely,
tried to engage Him, He never broke character.
My son had taken a seat atop one of the picnic tables, when
I notice Death approaching behind him.
Death sat down next to him and although my son started when he saw who
his new bench mate was, he didn’t say a word.
He just scooted over a bit and then so did Death. My son gave him a look as if to say, “What
the heck?”, but still he remain silent and scooted over a bit more and Death
followed. And that’s how it went with two silent figures in the dark, one
inching closer each time the other moved away, and I the only witness to this
seated dance with Death. Until, “Whumph!” Death and I looked over to see two feet
sticking up in the air, my son had scooted right off the edge of the
table. Death looked momentarily surprised
in so much as one can looked surprised behind a cloth mask. When my son's head popped
up and we could tell he was alright, Death let out a bellowing laugh that
shook his entire hulking form.
Some may claim to have laughed in the face of Death, but so far as I know my son is the only person to have made Death laugh.
This was also the same Death that inspired my daughter to get a costume last year, which she used for Creepmas and she aspires to be Little Death on the next hike.
Some may claim to have laughed in the face of Death, but so far as I know my son is the only person to have made Death laugh.
Saturday, December 1, 2012
Merry 13 Days of Creepmas
The 13 days of Creepmas may be new, but Christmas creepiness
has always been there. Sometimes it
lurks behind cheery traditions, while other customs proudly wear their
creepiness right out there for everyone to see.
The scythe is my latest papier mache project. The blade was
drawn free hand on a cereal box. I
taped rolls of newspaper between the top edges of the blades to give it a
tapered look. I taped the edges and then
started slapping on the papier mache, doing 5 layers of recycled paper and 2 layers of tissue paper. I spray painted it black and finger painted
on acrylic highlights. The staff is
a 5/8 wood dowel striped with electrical tape.
For me it’s also mainstream stuff that creeps me out. Things that give the outward appearance of being
joyful and nice, but they always make me feel that something diabolical waits
beneath the surface, like clowns.
So on the first day of Creepmas I give to you a Little Death
with a candy cane scythe. When I
mentioned Creepmas was coming up, my daughter gleefully shouted, “I can wear a
Santa hat with my death costume!”
I thought what a great idea, I also thought she would don
her costume for a quick photo op and that would be it. That wasn’t what she had in mind at all. I did get my photo, but then we went door to
door handing out candy canes bundled in ribbons with Creepmas tags to our
neighbors. I did all the talking,
because she was quietly skulking in character.
Our neighbors are used to us, they come to our Halloween craft party
every year, but I have to wonder what people driving by thought.
So here’s my version of a Merry Creepmas card. If zombies are more your thing I found these
awesome Holiday cards available for free.
Subscribe to:
Posts (Atom)