

In a little bit I'll show you how this started out as my most failed texture attempt so far, but first lets talk about texture paste.
For texture paste I have used approximately a 1:1 to 2:1, paint to glue ratio and then tried various thickeners. Now I haven't exactly gone about this scientifically, but as far as I can tell, at least in the short term, they all give the same basic results.
Spackle was the first thickener I used because I have some old stuff to use up and when that's finished I'll move on to the joint compound. Those sort of products definitely start to degrade before I use them up fixing walls so I might as well use them elsewhere. They also seem to make the smoothest texture paste.
I tried baking soda, that seemed to be another popular choice. It felt gritty, which wasn't that noticeable if I made a thin paste. Making a really thick paste resulted in an end product that had a rough, sand papery texture. Which isn't necessarily a bad thing.
Talcum powder was another one I saw in a lot of recipes. I couldn't find plain talcum powder. But I had some old baby powder and now I remember why I never used it on my babies. I don't like the smell. I don't like that cloud of fine particles that gets in the air no matter how gently you try to squeeze the stupid bottle. It wasn't as gritty as baking soda, but I hate breathing that crap in. I guess I could wear a mask, but it seems easier to just not use baby powder.
I also saw cornstarch and flour being used. I'm sure they make a nice consistency but I'm always leery about their propensity to attract bugs so I didn't try them.
Moving on to fun things to do with texture paste. Again these are all flat sample pieces but any of these techniques would work on bottles, skulls, pumpkins, etc.

You can use a paint brush to lay down some texture or the tip of the handle to add some dots. Do a search on relief painting for more ideas.
You can try this freehand or print out an image and paint over it.

You can use the texture paste the same as you would decorator icing. I purchased an inexpensive 4 pack of plastic piping tips and used a disposable bag. I went with plastic because all my icing tips are metal so this way I know for sure they will never get cross contaminated. I'm not good with icing and I sure wasn't any better with this.

I can do stars.
Most of the stuff I did was so awful I just scraped it up right away and reused it. I'm hoping someone at the craft party with actual skills will give this a try.

I'm really am awful with a piping bag. But I found that if I dragged the tip of a palette knife through my awful piping I could make it less awful.

Last year a friend had a henna party. It was so fun and I thought if I practiced enough I could come up with my own skull designs. Except I really didn't practice much, so that didn't happen. But I did learn that you can use thick lotion to practice on yourself. Which is great, all your mistakes can be wiped away and they moisturize your skin. Or you can use paint on paper. I also learned how to make henna cones out of cellophane. And that's what I used here for some precision piping. You could also use a squeeze bottle with a very small opening.

I'm not much better with a henna cone than I am with an icing bag.
Nothing I tried doing worked out as demonstrated above.

On a whim after all that disappointment I made this boney arm, which I have to say isn't have bad. And then I got cocky and thought I'd make a skull which ended up a complete mess. I still don't know why I made the teeth recessed instead of the spaces between.

Painting didn't help.

Just knocking off the bottoms of those horrible teeth and slapping on more paint helped. I could have completely removed them and re-piped them properly, but I didn't want to invest anymore time. And even though it's still a poorly done skull it can be layered with so much other stuff that you won't even notice.

Case in point right here. All those random failed doodles, that I probably would have scrapped but I liked the "Halloween" on the packaging cardboard. So I slapped on more texture paste a few skull beads and plastic bugs and gave it a coat of paint. I used some crappy fluorescent green paint that's never mixed properly no matter how well I shake it.
The lesson here is that in art mistakes are like a dead body,
bury them under enough stuff and no one will ever know.
Since with the exception of the skeleton hand, everything I did was a fail I decided to get a little help from The Graphics Fairy. I tore out the images after printing instead of cutting for a little added texture and then I glued them onto some old school folders for a bit more structure and tore around them again.
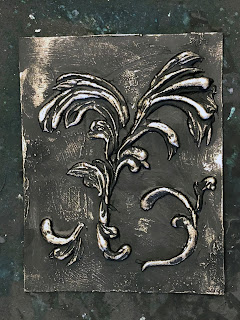
The following have all been piped using a henna cone. At some point these may get slapped on a bottle. It should be easy to add lettering in the center later with more piped texture paste. Or alphabet pasta is a cheap and easy way to add raised lettering.

Here I cheated and made the thin lines by dragging the paste with a toothpick. Cheating is never the answer kids. You can see where the lines are barely thick at all and downright disappear in places.

Rather than cheat, pick a thicker design until you hone your skills.
The following two were pretty easy designs to do.


This was a small pattern and I tried different approaches, but none of them really worked. I didn't finish so you can see the original pattern compared to what I did.


Since the one thing I really had success with was hands I decided to use a Hand Bone picture. It worked really well. I can't wait to try more skeletons.


All the lovely bones together.

I use this technique for highlighting raised texture. Squirt very small amount of paint in palm of non-dominate hand. This hand can also be used to hold the object being painted, by the fingertips of course and the palm must be kept facing up. Rub paint in a circular motion with pad of index finger on dominant hand to spread it out. With just a thin layer of paint left on index finger lightly rub across textured surface to pick up highlights.
The thin small amount of acrylic will dry very fast so you will have to repeat the process multiple times.
I prefer this finger painting method to a more tradition dry brush method because:
A) I can feel the thickness of the paint, which needs to be very thin
B) I can feel the wetness of the paint, it dries quickly so I know exactly when to reload my finger
C) Precision control over how much paint is applied. The lightest touch will deposit only a small amount, more pressure will deposit more paint.
D) The pad of my finger is too big to fit into any little crevices, so I only get paint on raised areas.
E) It may look messy, but it rubs right off once it's dried. (The picture above is messier than usual because I was highlighting multiple pieces.)
So there's my latest adventure with texture paste. Tune in next time when I have real actual stencils to try instead of stuff I found laying around the house.
So in the end, which of the texture recipes have you gone for here?
ReplyDeleteI liked the spackle best, but I'd use the others in a pinch. To brush it on I started with roughly a 2:1 paint to glue ratio mixed with spackle. I needed to thicken it with more spackle when using the icing tip and then I needed to add more paint to thin it out for the henna cones. Maybe I should add a little more info to the original post.
Delete