At last year's craft party a few of the kids added glitter to their potions. One friend remarked later that every day her daughters would give their potions a shake and watch them swirl around. She suggested it would be even better if we could make the swirling effect last longer.
I did a little digging and came across "calming jars". The idea is that watching the swirling glitter slowly fall has a meditative effect. I saw them mostly in reference to calming toddlers, but I can get lost in the hypnotic sparkling swirls just as well as any three year old.
To make a calming jar you need a jar, water and glitter glue. You can add food coloring or extra glitter. Keep in mind the larger the glitter, the faster it falls.
There are a lot of different recipes, 1 tablespoon glitter glue to 1 cup water seems to be pretty popular. At the time all I had on hand were some half dried tubes and bottles of glitter glue. It seemed wrong to go out and buy new glue, just to render it useless with a bunch of water, when I already had a stock of useless glue. So I added hot water to what I had, let it sit for a few minutes to soften up, gave it a really good shake and voilà, magical shimmering water.
Depending on how gummy and dried up the glitter glue is, you may need to repeat the process a few times to get all the glue out. For the little tubes it's easier to fill them if you twist off the tips, squeeze out all the air and then submerge them in a dish of water. Once they refill put the tips and caps back on, shake and pour. You can add water weeks or months in advance and just let them sit, time will do all the hard work for you. I love finding uses for stuff that would otherwise just end up in the trash.
I also tried a few adding a little white glue, I thought it might give a nice murky effect. It didn't. It took a lot of food coloring to add color and the fine glitter just got lost in it. I'll save watering down white glue for papier mache.
I was curious about shelf life. Now that my bottles are almost 10 months old, I bravely, with no regard to my personal safety gave them each the sniff test. The bottles that contained only tap water, glitter glue and glitter were fine. Those that contained food coloring had a very dank dark cellar smell. Either food coloring doesn't play well with others, or Cthulhu has been peeing in my potion bottles again.
My last words of wisdom are about bottles. Any leak proof bottle will work for this project, but with kids in mind and the Halloween craft party right around the corner I really liked the single serving plastic wine bottles. I had more fun filling multiple smaller bottles with different glitter combos than one big bottle. The one pictured on the left with the red food coloring and black glitter glue is my favorite. I like plastic for the younger kids, but not so young that they're going to choke on the caps and I also just like the shape. Normally I hate getting labels off plastic, but the two different brands that I've tried have thick vinyl labels that peel off easy and leave very little residue.
By the way those little bottles of wine are great to have on hand for cooking, but using them that way takes a long time to save up a nice stock of bottles. I'm starting to think those mini liquor bottles would look cool too. Would it be wrong if I plied my friends with cheap wine and liquor just get the bottles?
Friday, August 9, 2013
Saturday, August 3, 2013
Skullified Footware
I've been hearing about how comfortable these sandals are. They've been my daughters choice of footwear for the past two summers, so when I saw a pair on sale I thought what the hell.
I really am a function before fashion girl, but these were so blah, I had to do something. If I've learned anything from my recent Bob the Builder adventure it's that everything can be dressed up with a few skulls. I used a combination of Testors paint pens and Sharpies.
For the record I don't find them all that comfortable. I am spoiled, I get to spend most of the summer barefoot, and it's hard to find anything more comfortable than that. The nicest thing I can say is they are really easy to slip on when I do need footwear and of course now they look really cool.
I really am a function before fashion girl, but these were so blah, I had to do something. If I've learned anything from my recent Bob the Builder adventure it's that everything can be dressed up with a few skulls. I used a combination of Testors paint pens and Sharpies.
For the record I don't find them all that comfortable. I am spoiled, I get to spend most of the summer barefoot, and it's hard to find anything more comfortable than that. The nicest thing I can say is they are really easy to slip on when I do need footwear and of course now they look really cool.
Sunday, July 28, 2013
Delightfully Twisted Artwork
I purchased this brilliant skull painting from a young, up and coming local artist. My daughter and her friend decided to have a sidewalk sale of their original watercolor paintings to benefit the Humane Society. My girl did the skulls just for me because she knew it would be an easy sale. Both of them did an incredible job planning, painting and setting up.
Their other works weren't nearly so dark, but I count myself lucky to have snatched up her friend's painting that I like to call "Not a Fan", because she said it's not a fan, it's abstract. (But I can still see it spinning and the breeze blowing, which is a little weird if it's not a fan.)
I almost missed the big annual art fair downtown, which would've been a travesty. Not only were most of my favorite artists there, but I saw quite a few others for the first time that already I can't wait to see again and I came home with some amazing artwork. I thought I'd share the artists that appeal to my warped nature.HJMetalsmith.com - I love the creepy cool bugs, especially the praying mantis, but I can admit I also like the pretty butterflies and flowers.
Wagalabagala.com - I could get lost in the worlds he creates and am slowly amassing a collection so I can do just that.
MelvinMcgee.com - "Blue Band" is one of my favorites, it's like a mix of Blue Man Group and Dr. Seuss. "Alien Ark" is another one I just had to have. I love the brilliant colors, the humor and the out of this world experience his paintings give me.
Juliadams.com - She had me with Memento Mobile a few years ago and I've been back for more every year since.
ArtByTai.com - I liked his mutated Boba Fett, but it was the mixed media version of his frog grenade that I fell instantly in love with. I didn't think it could get better than a zippered frog with Born to Kill sketched on his Kevlar, but it was aptly titled Full Metal Frog: Apocalypse Amphibian, which was the icing on the cake for me.
Eslingergallery.com - I love the eerie twists on my childhood icons. The Cheshire cat and the Grinch were always creepy, but it's like he's removed that thin veneer that kept us safe and sane.
Atomic7studio.com - The wall of painted decks at his booth caught my eye. I've always felt like I'm walking into an art exhibit when I enter a skate shop and for a moment it was as if the reverse was true and then I was swept in by everything else he has to offer.
MadTatters.com - I love the 3D skull art and the paintings are fabulous. You have to click on the blog link to see "Not a Sparrow Will Fall" by Ellie Rusinova
StanleyScott.com - Very dark, I really loved the ones that made me feel like I was walking into a metal vortex.
Dolangeiman.com - I love this Señorita. She was even more stunning in person.
EricHazeltineart.wordpress.com - He wasn't at the fair this year, but I saw him last year and hope to see him again. I love his beautiful skull work.
Monday, July 22, 2013
Toilet Paper Roll Mummy
This is my toilet paper roll mummy.
There are many like it, but this one is mine.
The two things that I've added that I don't see on most others is a rounded head and stable base.
For this mummy you will need:
Thin cardboard (cereal box)
White craft foam sheet
Toilet paper roll
Paper towels
Googly eyes (15mm)
Printer
Scissors
Glue
Tape (clear or white)
The first thing to do is cut strips. For this I used paper towels, but you could use anything whitish and pliable that can be cut into strips. Cheesecloth, muslin or old white T-shirts would all work well.
I like the Bounty select-a-size. Each sheet is 11x6 inches. You will need 4-5 of these cut into four strips each. After the strips are cut crumple them into little balls to give them a little more texture.
Then make a template for the feet. You can skip this step if you're only making one, but you'll want to make more, so just make the template.
Just to make sure the scale is right, when printed the feet should measure 3 inches across the widest point.
To lay down the strips put a little dab of glue where you want to start and then just wrap them around every which way. Twisted, crumpled and messy gives it more character. I use a dab of glue at the ends, maybe one in the middle, but I don't glue too much until I'm done. Then I make my final adjustments and add glue anywhere that needs it. The last step is to add the googly eyes and glue the body onto the foot base.
There are many like it, but this one is mine.
The two things that I've added that I don't see on most others is a rounded head and stable base.
For this mummy you will need:
Thin cardboard (cereal box)
White craft foam sheet
Toilet paper roll
Paper towels
Googly eyes (15mm)
Printer
Scissors
Glue
Tape (clear or white)
The first thing to do is cut strips. For this I used paper towels, but you could use anything whitish and pliable that can be cut into strips. Cheesecloth, muslin or old white T-shirts would all work well.
I like the Bounty select-a-size. Each sheet is 11x6 inches. You will need 4-5 of these cut into four strips each. After the strips are cut crumple them into little balls to give them a little more texture.
![]() |
| Feet Template |
Then make a template for the feet. You can skip this step if you're only making one, but you'll want to make more, so just make the template.
Just to make sure the scale is right, when printed the feet should measure 3 inches across the widest point.
Glue a rough cut of the template onto the cardboard and then cut along the outside edge of the line when it's dry.
If you plan on using this for a craft party and don't want someone gluing the template to their project thinking they found a pair of feet already cut out or for the template to accidentally get tossed during cleanup write "TEMPLATE" on it. I speak from experience.
Then trace your template onto the white foam.
Cover the foam with a thin layer of strips. Tear them into smaller pieces, leave parts of them crumpled and twisted, but make sure all the folds are glued down well. After it dries trim around the edges.
While waiting for the feet to dry, make the mummy body. Start with a toilet paper roll. I prefer the brown ones, but if yours are white you might want to use paint or construction paper to darken a face area. Create an "X" across one end of the roll with tape. Then loosely crumple 3 sheets of the aforementioned paper towels. If yours are a different size or thickness you'll have to adjust.
Gently stuff the tube with paper towels, until just a little dome sticks out the top. This will be the mummy's head. Create another "X" over the dome with tape.
Lay a strip across the top of the mummy's head. Then cross another strip over the first, not quite perpendicular, so that you leave some room for the face. This lays down a nice layer of white, to build on.
Next gently tie a strip around the middle of the tube to hold them in place. Then tie two more, one at the bottom and one at the top, staggering the ties so it's not all bulky on one side. The reason I tie instead of glue is to be able to move things around. Make sure the two strips from the previous step are where you want them and push them aside near the top to create a face area.
Below are a few variations we've come up with using scraps of this and that. The bats were made by the kids in preschool. I have not made TP bats, but when I do I'll use the body style shown at Filth Wizardry.
Tuesday, July 2, 2013
Death Om Nom
The next addition in the Twisted Om Nom's is Death. I don't draw much, almost never because I find it frustrating. My abilities and my aspirations don't exactly see eye to eye. I realize I'll never improve with that attitude, so these Om Nom's are my scary adventure outside of my comfort zone. With each one I find out just how much I don't know, like how to draw draping cloth, but it's fun trying. If you've seen my Sugar Skull Bunnies then you know I just recently discovered the world of converting sketches to line art following the basics of this video. Death is my first attempt at trying to use the inking technique that's demonstrated in the video. I think it does give the lines more character. I'm not sure how much I'll use it, but again it's fun trying new things. And here's one for you to color.
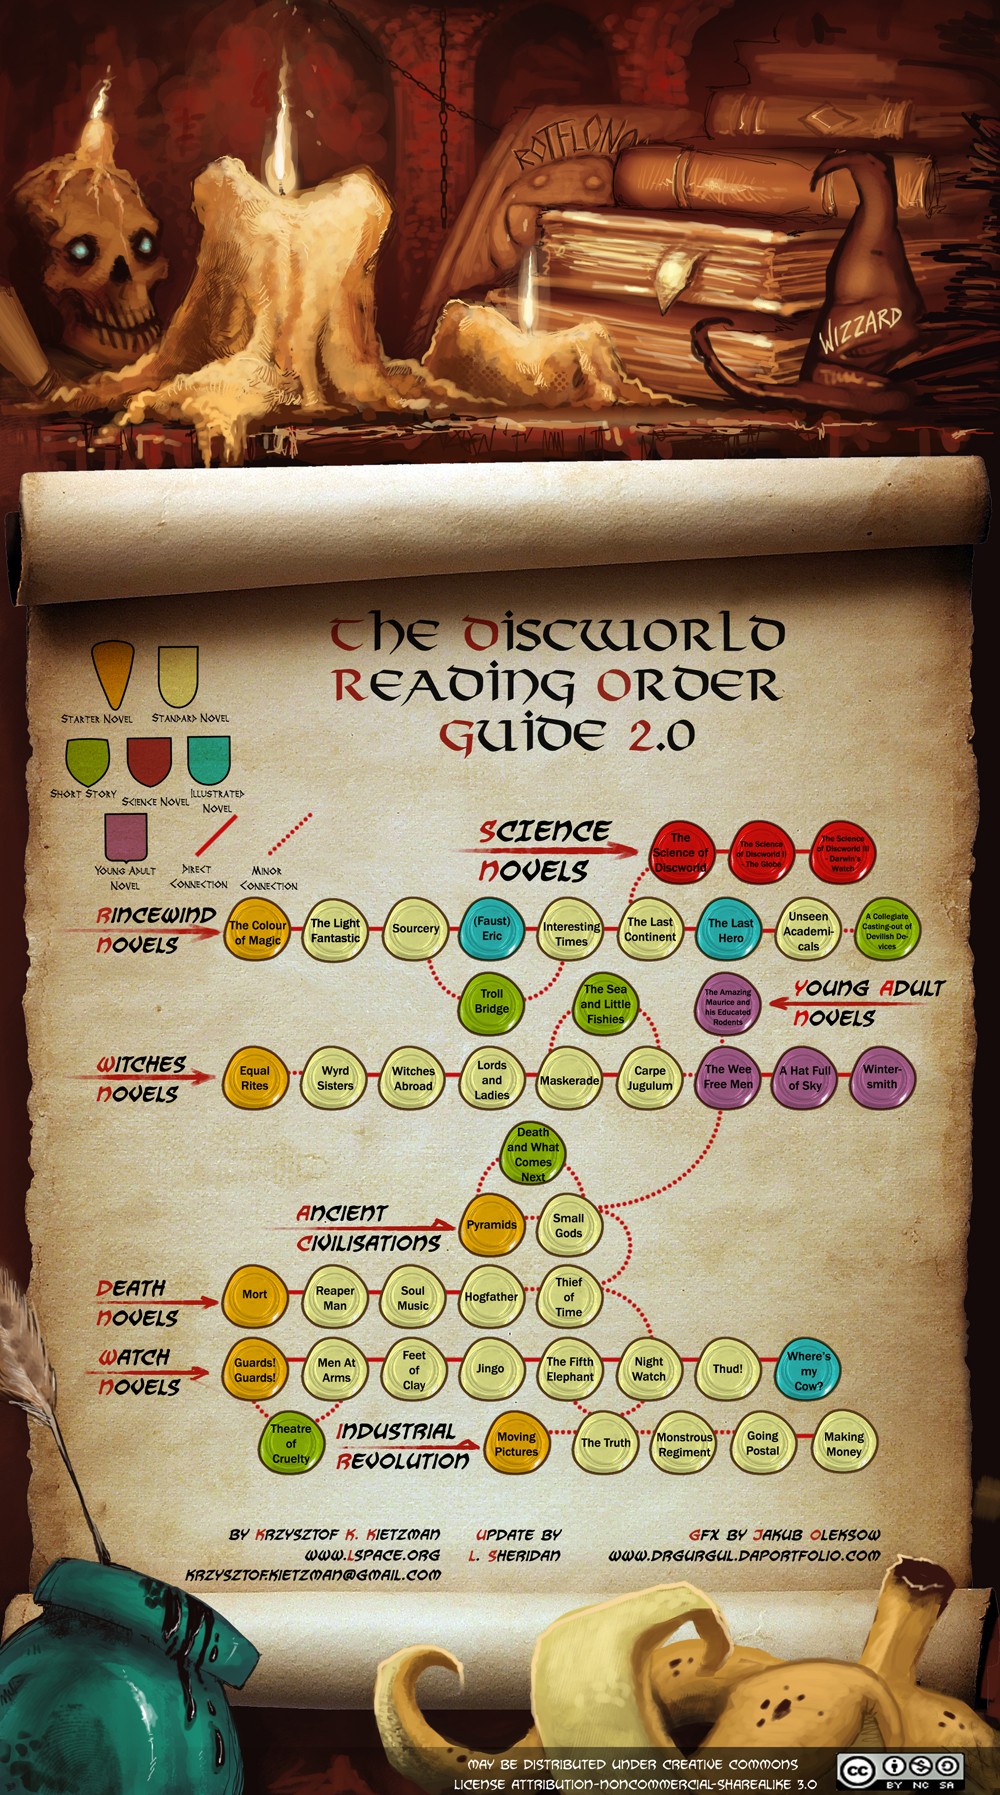
My favorite Death is from Terry Pratchett’s Discworld series. This is a great chart of how all the
Discworld books are laid out.
I can’t mention the Grim Reaper without writing about my son’s
brush with Death. Last fall one of the
state parks hosted a night hike. Little
did we know as we set off, how close we would come to Death that evening. But on
our way back to the main shelter we saw Him. Lurking amongst the groups of
hikers, He never mingled or spoke a word, just silently skulked around the fringes. No matter how hard people, however unwisely,
tried to engage Him, He never broke character.
My son had taken a seat atop one of the picnic tables, when
I notice Death approaching behind him.
Death sat down next to him and although my son started when he saw who
his new bench mate was, he didn’t say a word.
He just scooted over a bit and then so did Death. My son gave him a look as if to say, “What
the heck?”, but still he remain silent and scooted over a bit more and Death
followed. And that’s how it went with two silent figures in the dark, one
inching closer each time the other moved away, and I the only witness to this
seated dance with Death. Until, “Whumph!” Death and I looked over to see two feet
sticking up in the air, my son had scooted right off the edge of the
table. Death looked momentarily surprised
in so much as one can looked surprised behind a cloth mask. When my son's head popped
up and we could tell he was alright, Death let out a bellowing laugh that
shook his entire hulking form.
Some may claim to have laughed in the face of Death, but so far as I know my son is the only person to have made Death laugh.
This was also the same Death that inspired my daughter to get a costume last year, which she used for Creepmas and she aspires to be Little Death on the next hike.
Some may claim to have laughed in the face of Death, but so far as I know my son is the only person to have made Death laugh.
Saturday, June 29, 2013
Creepy Clown Om Nom
Where are the clowns? Send in the clowns.
Here is Creepy Clown Om Nom and his little black and white friend for you to color.
My first clown induced scare was Poltergeist. I love this bit by Dan Cummins about that clown and clowns in general.
Before that, the clowns of my childhood were depressing. They weren’t meant to be laughed with, they were meant to be laughed at. Unless they were being mean to other clowns, then it was ok to laugh with them. Velvet paintings of tearful hobo clowns illuminated the human condition, showing us the pain and misery behind the makeup. But it was this video that filled my young heart with utter despair, dancing clowns across a haunting melody. Shame on you Muppet Show, not only did I love you, I trusted you with my innocence.
My favorite and possibly the only clown movie I’ve ever seen is Killer Klowns from Outer Space. It’s an 80’s B movie, but it’s worth seeing at least once.
My last clown offering is Junie B., First Grader: BOO...and I MEAN It! We own all the Junie B. Jones books and they have been lovingly read and reread and when my kids are grown and gone, I'll still be reading them whenever I want a good laugh. In this one Junie B. learns some scary stuff about Halloween and decides to overcome her fears by being even scarier. What could be scarier than real witches and monsters? A clown of course.
Saturday, June 22, 2013
Button Eyed Om Nom
Next up in the Twisted Om Nom series is a rag doll version. Still fumbling my way through Photoshop, today I learned about patterns.
Here's the outline if you want to color your own.
In the world of crafting googly eyes have the ability to add
personality to any inanimate object, but button eyes have the power to create a
soul. There’s the creepy cute like Mr.
Gosh in Roman Dirge’s Lenore comics. There’s
the creepy scary like the Other Mother in Neil Gaiman’s Coraline and then there’s
the pure creepy evil which I’ve already covered during Creepmas.
Sometimes button eyed rag dolls aren’t creepy at all, made from a few scraps
and a lot of love, like Laura’s Charlotte.
Friday, June 21, 2013
Om Nom Vampire
I’ve decided to twist Om Nom into things that go bump in the
night. To start things off here is my
take on the classic vampire.
I could never do those “How to Draw” books, where they go
from basic shapes to a detailed drawing in five easy steps. I couldn’t get past step 1, my shapes were always
disproportionate and never looked like the pictures. I thought after 30 years
it couldn’t hurt to try again. These Om Nom instructions are about as simple as you can get and I still couldn’t get
mine to look the same. That’s alright
because mine are more Om Nom’s deranged second cousins anyway.
I’m also trying to learn how to color in Photoshop. I looked at a few tutorials and what I
learned was everyone does it differently.
So I’m just going to play until I figure out what works for me. Here’s a black and white version if you’d
like to color your own.
Some Vampire literature that I don’t think gets nearly
enough recognition, in no particular order:
Sunday, May 26, 2013
Ultra Violent Radiated Maggots
Clockwork Orange Ultra Violent Radiated Maggots. According to this website “A maggot mass can reduce the body weight of a corpse by 50% in a matter of a couple of weeks.” Ultra Violent Maggots can do that in the first 24 hours, rather useful if the bodies are starting to pile up.
The font used is Timepiece by FontMesa. I can’t remember where I copied the picture from, but here it states the artwork is from a poster for the film. The maggots are genuine glow-in-the-dark rubber, set in floral water gel. I found the maggots in the make-up aisle at a Halloween store. You can see they've become translucent in the gel, but they and the water both glow very nicely in the dark.

I’ve provided two labels. The one that I used is curved to fit a tapered bottle of Walkerswood Jamaican Jerk Seasoning.
You may not have a bottle of Walkerswood Jamaican Jerk Seasoning, so I'll give you a reason why you should. You can find the original recipe here. I've modified it below with extra veggies, less oil and extra lime juice. Even with the additions it is still very hot and spicy, depending on your palate you may want to use less seasoning or opt for their mild version, which I have not tried. Garnishing it with some plain yogurt will also take down the heat. It's also good as a bean dip with tortilla chips and for Halloween you can serve it as Zombie Flesh Puree.
Black Bean Soup
1 tablespoon Caribbean jerk seasoning blend
1 1/4 cups canned vegetable broth
2 15 ounce cans Caribbean-style or regular black beans, drained
1 cup skinned*, seeded, diced tomatoes (about 2 med sized tomatoes)
1 cup shredded carrots
1 tablespoon olive oil
1 cup frozen corn
1/4 cup fresh lime juice
Lime wedges
Plain yogurt
Stir 1 tablespoon seasoning blend in heavy medium saucepan over medium heat until fragrant and slightly darker in color.
Add broth, black beans, diced tomatoes and carrots. If you want a chunkier soup only add one can of beans for now. Bring to a boil, then simmer, stirring occasionally until the carrots are tender.
Transfer soup mixture and olive oil to a processor and purée until mixture is almost smooth, scraping down sides of bowl occasionally.
Transfer purée to same saucepan. Bring to boil again, add the frozen corn and additional can of beans if you chose not to puree both cans. Stir occasionally until heated through.
Remove from heat and mix in lime juice. The original recipe says to season to taste with salt and pepper, but I’ve never found it necessary. You can serve it immediately with lime wedges and yogurt, but I always prepare soups a day ahead so the flavors have time to mingle.
*If you’ve never skinned a tomato before, it’s super easy. Get a pot of boiling water and a bowl of ice water ready. Make sure stems are removed and the tomatoes are clean. Cut an “X” into the skin on the bottom of your tomatoes. Boil the tomatoes for about 20 seconds, just until the “X” starts to widen. Remove them with a slotted spoon and place them into the ice water. After they are cooled, pat them dry, pull up the skin at the “X” and just peel it back.
Friday, May 17, 2013
Bob The Skull Bag

This Bob the Builder bag was originally my son’s. He never did get into Bob the Builder, but it was the perfect size for a three year old to tote around his Hot Wheels cars, which he insisted on carrying himself, everywhere. As he out grew it, I started using it. It was the perfect size for a mom to tote around the essentials for a trip to the park, zoo, etc.
I did eventually buy a bag more my age, but I kept coming back to Bob the Builder. It’s water resistant, lightweight, extremely durable and as I've mentioned, just the right size. An ideal bag if you ignore the fact that unless you love Bob the Builder, it’s completely hideous. Being that I'm more of a function than fashion girl, for years I did just that, ignored it.
This week I was inspired and Bob will never be the same. While you might not have a Bob the Builder bag of your own, maybe there’s a Disney Princess or Wiggles bag in your life or at the thrift store that’s in need of a makeover.
The bag is a combination of canvas, felt and vinyl. To decorate it I used my limited palette of Sharpie’s, Sharpie fabric pens, Testors Paint Markers, one fabric glitter marker and two buttons glued on with E6000.
Saturday, May 11, 2013
Dirt and Worms
You can find a recipe for the quick and dirty version, at Kraft.
These days I run away screaming from anything involving Cool Whip, but I remember when my taste buds were young and used to think eating a frozen spoonful of that stuff was a little slice of heaven.
There’s no accounting for youth.
Now I can’t stand the taste of fake. Fake cream, fake chocolate, fake worms…not that I eat real ones, I just prefer to go without.
So I’ve modified this recipe for Double Chocolate Pudding Parfait. I make the pudding the day before, but really the whole works keeps at least four days (it’s never stayed around longer than that). I just keep the additional cookie crumbles off the top until right before serving. Even if you still want to make pudding out of a box, just substituting real whipped cream for Cool Whip makes a big difference.
Dirt and Worms
2 tablespoons cornstarch
1/4 cup sugar
2 tablespoons unsweetened cocoa powder
2 cups whole milk
4 ounces fine-quality semisweet chocolate, finely chopped*
1 tablespoon unsalted butter
2 tablespoons sugar
1 cup chilled heavy cream
1/2 teaspoon pure vanilla extract
15 chocolate sandwich cookies, crushed
Gummy worms
Sift together cornstarch, 1/4 cup sugar, cocoa, and a pinch of salt into a heavy medium saucepan, then gradually whisk in milk. Bring to a boil, whisking constantly, then boil, whisking, until thickened, about 3 minutes. Remove from heat and whisk in chopped chocolate and butter until melted. Transfer pudding to another dish and chill. Let set for at least an hour.
Mix ½ cup of the cookie crumbles into the pudding.
Whip cream with vanilla and remaining 2 tablespoons sugar until it just holds stiff peaks. Fold into the pudding mixture and divide among 10 dishes.
Top with remaining crumbles and worms.
*I'm lazy and usually use chocolate bars that are thin enough to break into pieces by hand.
As I mentioned in my Creepmas Confections, I like using Lindt’s Sweet Dark (Sadly this is no longer available, but Dove Dark is a mild dark with a nice flavor.) and heavy whipping cream that hasn’t been ultra-pasteurized. I also chill my bowl and beater in the freezer before whipping the cream.
I've always had a problem with the pudding getting a little clumpy at the bottom of the pan. Even constantly stirring there's just so much surface area a spoon or whisk doesn't consistently reach. This silicone spoonula has changed all that. It's a spoon so it stirs, but it's also a spatula so it really scraps the sides and bottom of the pan and silicone so it can take the heat. Sorry for sounding like an infomercial but I find I can actually keep all the pudding in constant motion with this bad boy.
Bon appétit!
Update: First, to give an individual serving of dirt a more grown up taste, pulverize a pinch of instant coffee with the back of a spoon and sprinkle it on.
Second, the dirt and worms combo on Mother’s Day brought back some cherished childhood memories, namely The Hearse Song, that I learned from my lovely mother. I remember it being more of a poem than a song but I couldn’t quite remember the words and neither could she and none of the versions I found online are quite right.
After chatting about it, my memory jogged a bit and this is how I remember it:
Did you ever think when a hearse goes by,
That you would be the next to die?
They’d wrap you in a dirty sheet
And bury you six feet deep
Things would go well for just one week
Then the boards would begin to creak
The worms crawl in, the worms crawl out
The ants play pinochle on your snout
You turn all green and slimy and puss runs out
And me without a spoon.
Between this and Greasy Grimy Gopher Guts, I thought my mom knew the coolest stuff.
Sunday, May 5, 2013
Bleeding Backwards
Ok, I just couldn't let this one go. If you'll recall my last post I found my new catch phrase and the inspiration for my new film that I will never make. Which is more because of my lack of video equipment and the skills to adequately use said non-existent equipment than any restraining order Mr Reznor, may or may not have requested due to diligent efforts to secure his collaboration with the soundtrack.
But I did wake up with fragments of a poem, that I worked together into this:
I was caught up in a daydream
When I stumbled into you
I thought you were a daydream
When I tumbled into you
You drew me from myself
And that is when I knew
Now I see you bleeding backwards
And I know not what to do
The days they followed lightly
Scarce our feet did touch the ground
The days they followed brightly
Scarce our hearts knew what they’d found
The days they ended nightly
With you wrapped within my arms
Now I see you bleeding backwards
And I’m lost without your charms
I thought I heard you whisper
Another lover’s name
I thought I saw your gaze drop
To hide your face in shame
I thought I felt you shudder
And pull yourself away
Now I see you bleeding backwards
And my love for you decay
You swore it wasn’t true
But I saw through all your lies
You swore it wasn’t true
More foul deceitful cries
I know not now my rage
As I struck that fatal blow
But I see you bleeding backwards
And how the blood does flow
I see that there was no one
Just a notion in my head
I see that there was no one
Just the monsters that I fed
And now I’m left with no one
Just regret and pain whereby
I shall see you bleeding backwards
To the day you caught my eye
I hope this has exercised the demons and I can finally lay this project to rest, it's a long way to go for a potion bottle. I purposely stayed away from definitive pronouns because I believe love isn’t defined by gender or orientation and neither is murderous passion.
But I did wake up with fragments of a poem, that I worked together into this:
Bleeding Backwards
I was caught up in a daydream
When I stumbled into you
I thought you were a daydream
When I tumbled into you
You drew me from myself
And that is when I knew
Now I see you bleeding backwards
And I know not what to do
The days they followed lightly
Scarce our feet did touch the ground
The days they followed brightly
Scarce our hearts knew what they’d found
The days they ended nightly
With you wrapped within my arms
Now I see you bleeding backwards
And I’m lost without your charms
I thought I heard you whisper
Another lover’s name
I thought I saw your gaze drop
To hide your face in shame
I thought I felt you shudder
And pull yourself away
Now I see you bleeding backwards
And my love for you decay
You swore it wasn’t true
But I saw through all your lies
You swore it wasn’t true
More foul deceitful cries
I know not now my rage
As I struck that fatal blow
But I see you bleeding backwards
And how the blood does flow
I see that there was no one
Just a notion in my head
I see that there was no one
Just the monsters that I fed
And now I’m left with no one
Just regret and pain whereby
I shall see you bleeding backwards
To the day you caught my eye
I hope this has exercised the demons and I can finally lay this project to rest, it's a long way to go for a potion bottle. I purposely stayed away from definitive pronouns because I believe love isn’t defined by gender or orientation and neither is murderous passion.
Friday, May 3, 2013
Liquid Moonlight
Liquid Moonlight was created by a specialized team of
lycanthrope scientists employed by Wolfpack Infusions, because sometimes you
just don’t want to wait for a full moon to be able to transform. The font used for Liquid Moonlight is Alice in Wonderland. Just for fun I borrowed the side effects from Viagra’s website, since this could be considered a potency issue.
For directions on how to fold the label head on over to here. After the folding and cutting I laid it out flat again and brushed on a thin layer of acrylic varnish.
After that dried, I refolded it lengthwise and glued the open edges together on the end panels. Then I did the fancy fold in the middle and glued those together. This helps to keep the pages lined up. It's still a little off since the outside "cover" is the same size as the inside pages, but it works. Then I colored the cut edges with marker.
I was just going to use an 1/8th inch punch in the corner and tie it on. Instead I braided some very thin hemp with a few seed beads, wrapped it around and knotted the ends together. I ran two strands inside the booklet down the middle and the other four down the outside, two to the front and two to the back near the spine and knotted them altogether underneath. This holds the booklet quite securely and it's something new I haven't done before.
The content is a mixture of floral water gel and acrylic paint mixture of black, blue and silver.
While I was looking up the phases of the moon, (I can never
remember gibbous, even though it is so close to gibbons and who can forget
monkeys?) and I noticed a lot of links referring to the female cycle and how it
corresponds to the moon.
Zero links on whether or not a werewolf ovulates with the
full moon, closest hits are references to the movie Ginger Snaps, which I really enjoyed
right up until they started with the cheesy special effects. Note to aspiring directors: Sometimes less is
more, it never hurts to leave a little to the imagination, watch some Hitchcock, he’ll show you
how it’s done.
Anyway believe what you will about human females and the
moon, I’m just happy to have found this sentence “Today, many of us are bleeding backwards.” I just love the way that sounds.
If I had any skill in cinematography, my first film
would be a short entitled “Bleeding Backwards”. A sweet, tender love affair,
darkened by insecurities and misunderstandings until they reach a boiling point
of murderous jealousy. It would be
interspersed with stop-motion blood pooling backwards, telling the story in
reverse from the bloody, unwarranted tragic death to the chance moment when our
lovers first meet. Trent Reznor would do the soundtrack. As it is I'm only skilled in creating bad poetry, but it'll have to do until Trent calls me back.
Subscribe to:
Posts (Atom)